
")
")
")
")
It´s all about Speed and Precision: The making of the GR²ID reticle
It´s all about speed and precision when shooting Precision Rifle matches, and the reticle used for competition shooting is key to winning. Find out how the very subtle changes and details of the GR²ID reticle, sum up all the small parts which are essential to shave seconds off Precision Rifle stage times.
Contents
Part 1 – Speed and Precision – The story of the GR²ID reticle.
Part 2 – Laying out the basics
Part 3 – Understanding Volume
Part 4 – Balancing Volume for Reference
Part 5 – Adding quick reference – making things faster
Part 6 – Adding the details
Part 7 – Lighting it up
Part 8 – Speeding from Wide Vision to Tight Focus
Part 9 – Great Team
Part 1 – Speed and Precision – The story of the GR²ID reticle.
One of the main factors that we took into consideration when we designed the GR²ID reticle was Speed. Speed in target acquisition, Speed in finding reticle holds, and Speed in spotting impacts down range.
You might well ask: What does that mean, and Why does it matter?
When shooting a Precision Rifle stage, every second counts, and any tools that make target acquisition and engagement quicker give you more time on the stage to get to the last target and also more time for steadier shots.
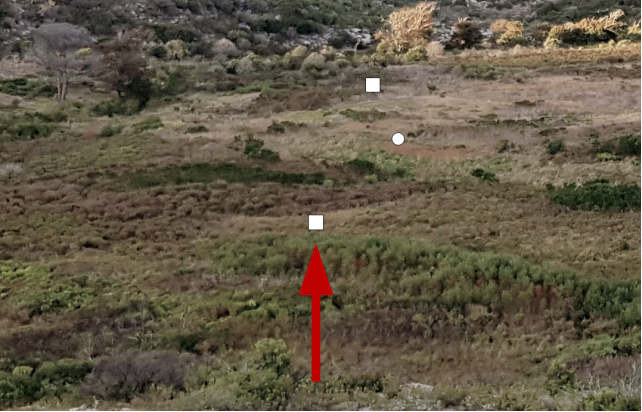
To better illustrate the problem, consider the following example stage:
Typical Precision Rifle stage – Tank Trap
There are 3 positions on a tank trap and 3 targets at various different distances between 450 m and 600 m. Each target must be engaged with 1 shot each from near to far from each position within a 2 minute time limit.
The following are some of the problems that need to be overcome:
- The targets have to be acquired from each position, which means you need to find 9 targets in total. Sure, there are only 3, but you have to find them separately 9 times in total. The higher the field-of-view, the easier it is to find targets through the scope, and logically this means that less magnification gives more field-of-view. On a First Focal Plane scope, which is preferable for Precision Rifle shooter, less magnification also means that the reticle gets quite fine and harder to see, and therefore harder to aim precisely.
- DOPE (Data Obtained from Previous Engagements) needs to be set for each target a total of 8 times while on the stage, ignoring the first target which you’re able to set before the stage starts. This takes a significant amount of time to dial on the scope, as the competitor needs to take their eyes off the target, check their DOPE on their DOPE card, focus on the turret, take their hand from the trigger to the turret, turn the turret to the correct elevation, return their hand to trigger and eye to scope, reacquire the target, hold for wind and then only engage. This often takes 3-7 seconds depending on the skill of the competitor, which means that these 8 target changes equate to around 20 to 60 seconds lost per stage. At worst case, that’s half of the available time given for the stage, which is massive.
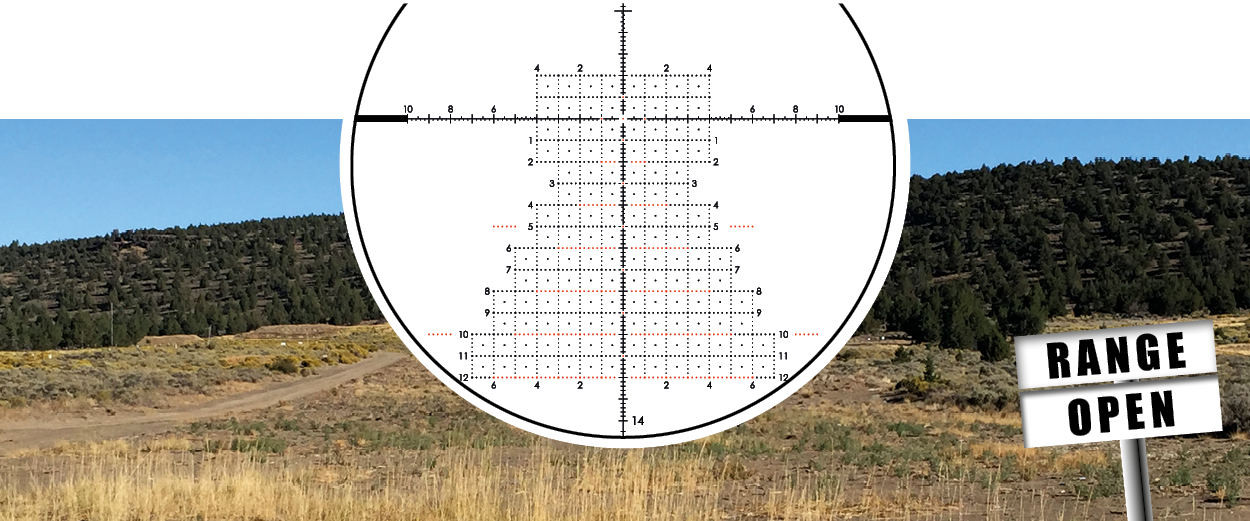
- The reticle needs to have sufficient stadia (hash marks) on the reticle to provide enough points of reference to be able to accurately hold for windage adjustment, especially given that targets are generally 2 MOA or 0.6 Mils in size. Too few points and your guess becomes hard to estimate, and too many and it gets confusing and slow to find the specific hold.
- Once the shot is made, it’s preferable not to have anything in the way of being able to see the hits on the target or misses in the ground behind. By spotting these impacts a competitor can make fine wind estimate adjustments and add that information to their next aim point to maximise hits on the next shots. Obviously the less that is in the way means the easier it is to spot those hits, and therefore; a plain cross hair or simple reticle would be best as there is nothing to obstruct the view of the target area.
From the issues outlined above, we knew we wanted a grid type reticle that provided holdovers in both elevation and windage, that had little reticle clutter, sufficient data points and was fast to use.
We quickly figured out that this was a bit like trying to juggle various sharp objects at the same time all while hopping on one leg… blindfolded. No easy task !
Part 2 – Laying out the basics
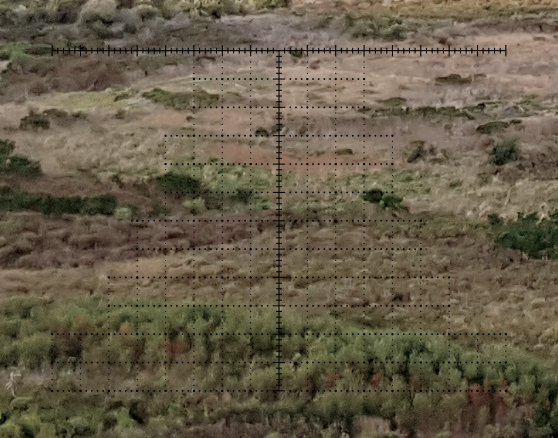
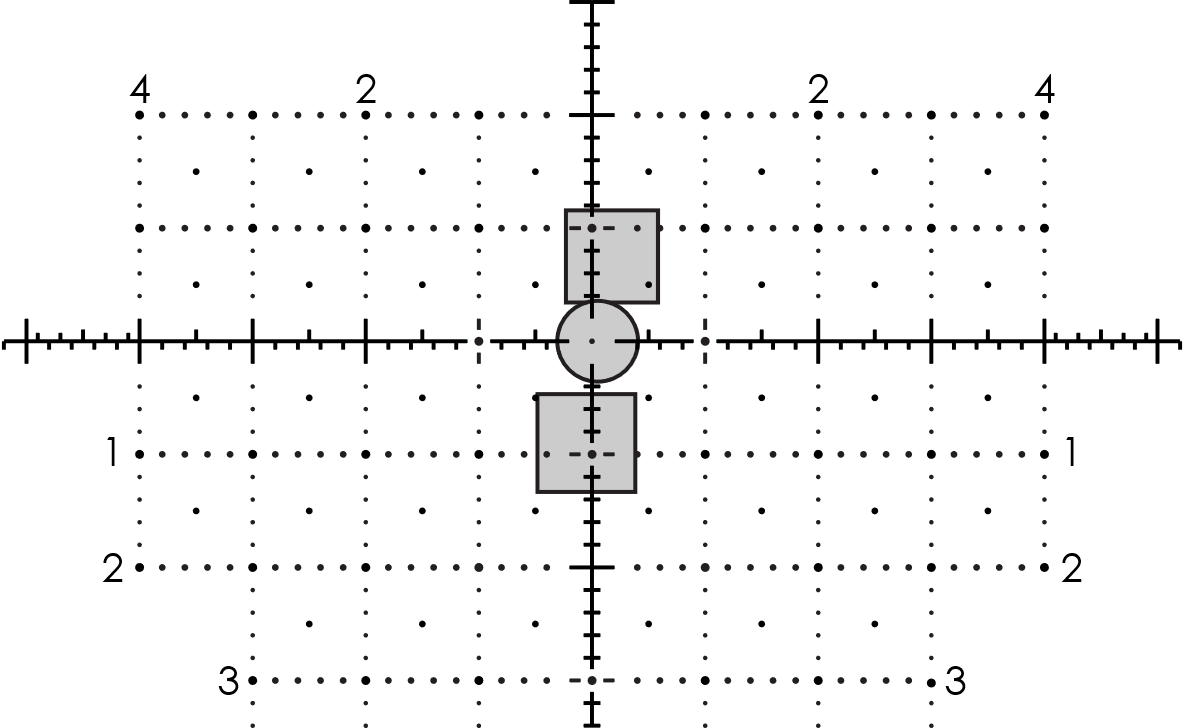
The first step in designing a grid type reticle is to consider the useful range of trajectory data that should be included in the reticle to cover all likely conditions. This is as simple as plotting the various trajectories by 5 mph wind intervals up to +/- 30 mph full value out to 1100 m on a 1x1 Milliradian grid or more commonly referred to as a 1 Mil grid.
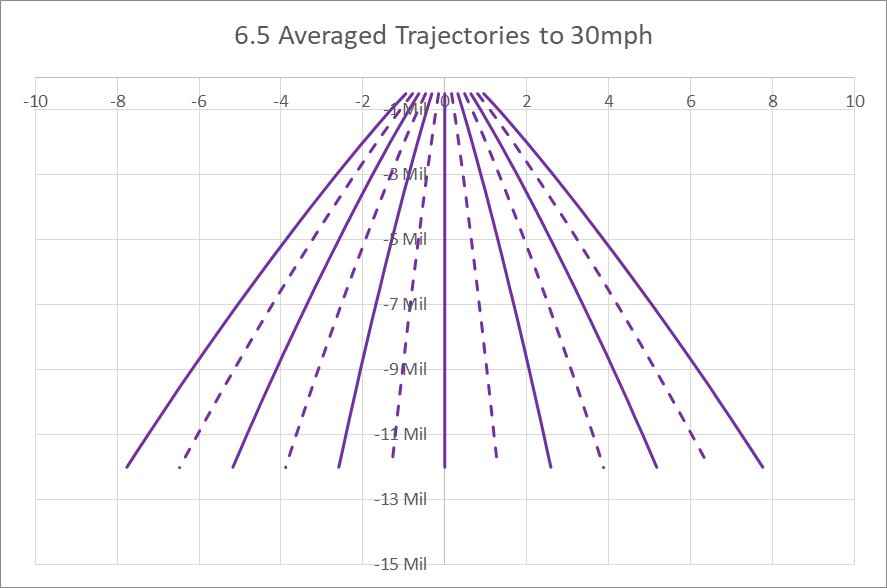
These were averaged for Northern/Southern hemisphere as well as right/left spin twist to cover all possibilities of barrels and conditions.
Once we had the coverage, it was merely a matter of laying out a grid over the trajectory area.
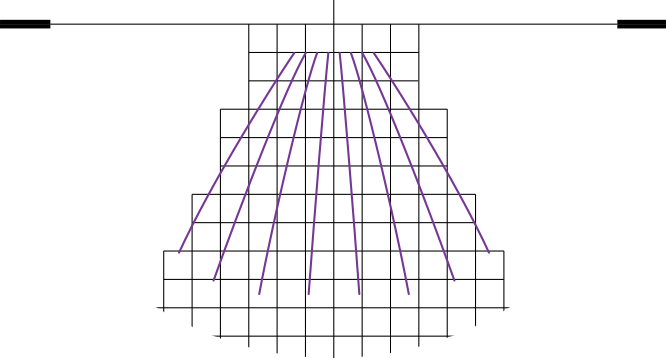
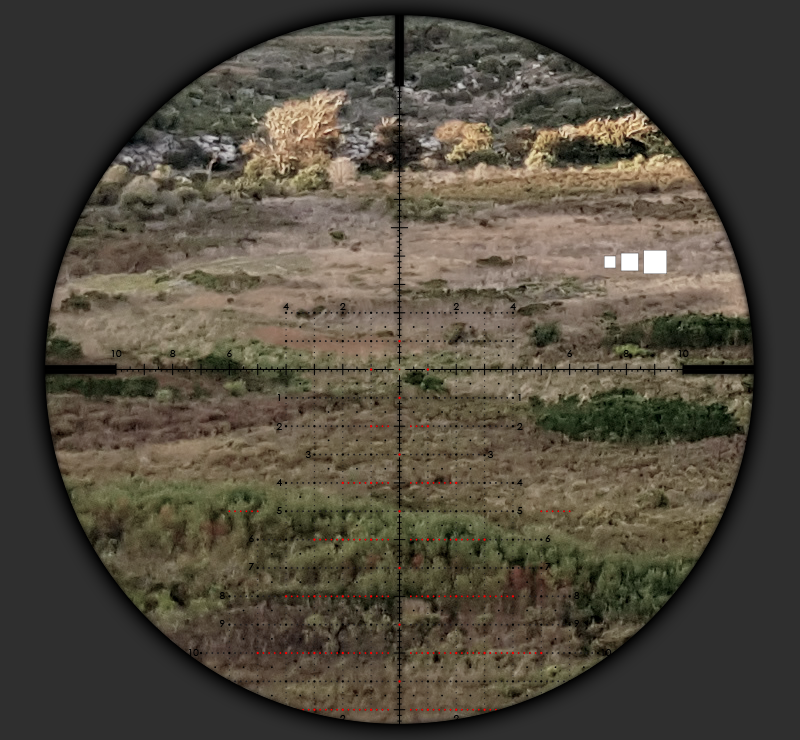
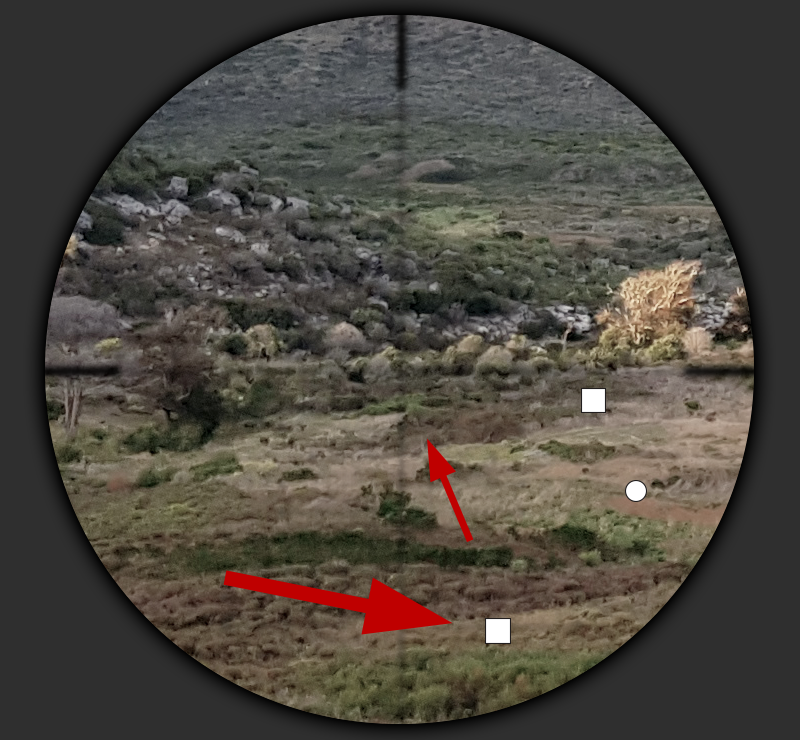
To get an idea of the coverage of the grid in a ‘through the scope’ example, we’ve overlaid the grid on a photo at various magnifications. In precision rifle matches, most competitors use between 12x and 16x magnification which gives a good balance of the field-of-view as well as enough magnification to see the detail in the reticle. Some accomplished competitors even go as high as 20x magnification once they have mastered the skill of target acquisition in a narrow field-of-view.
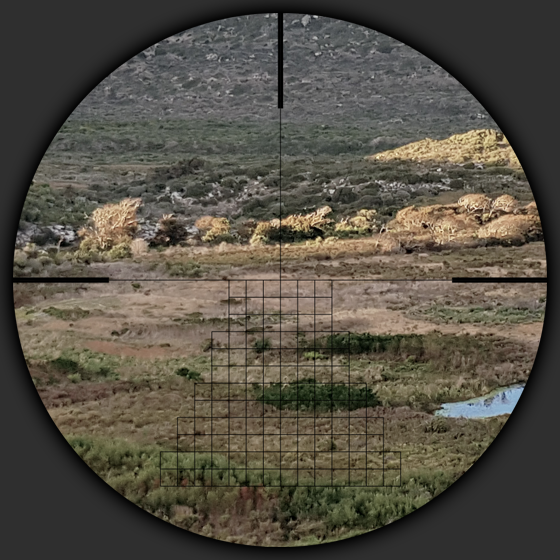
12x Magnification
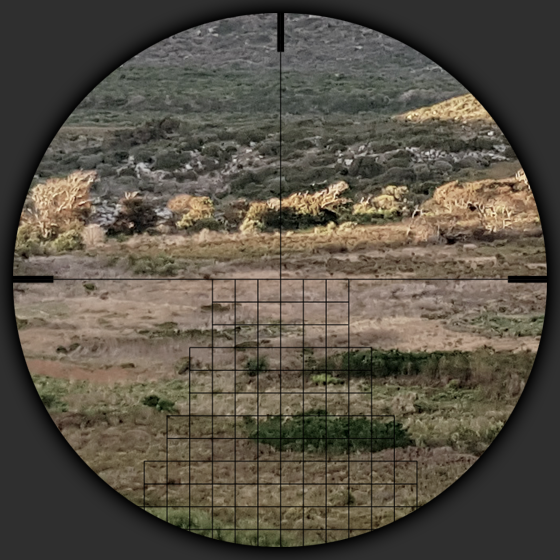
16x Magnification
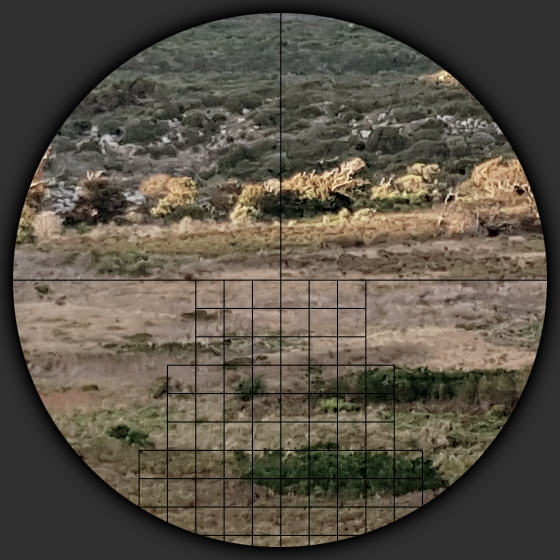
20x Magnification
Straight off, that’s a pretty cool grid reticle, but it’s very cluttered, distracting and quite difficult to find hold over points in that heavy grid. Basically, there is just too much ‘volume’ of line, even though we’ve used the thinnest reticle lines possible at just 0.035 Mil thick (the same as the legendary S&B P4FL reticle), and we’ve not even added stadia marks (holdover hashes) yet. So we needed to come up with a better way to provide the data, but a lot more subtlety.
The Wide Vision – Tight Focus key design concept.
One of the most important aspects to understand in reticle design is the usability of the reticle and the process that a competitor takes when finding a target before taking their shot.
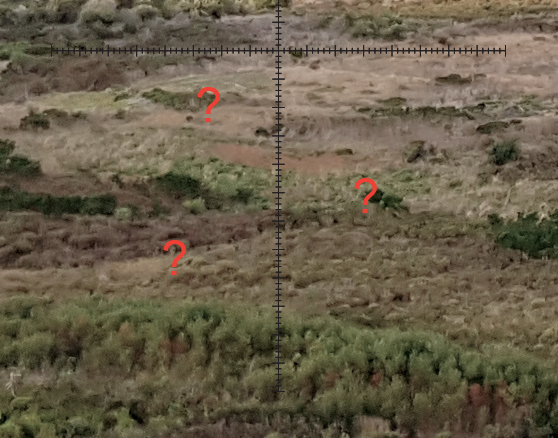
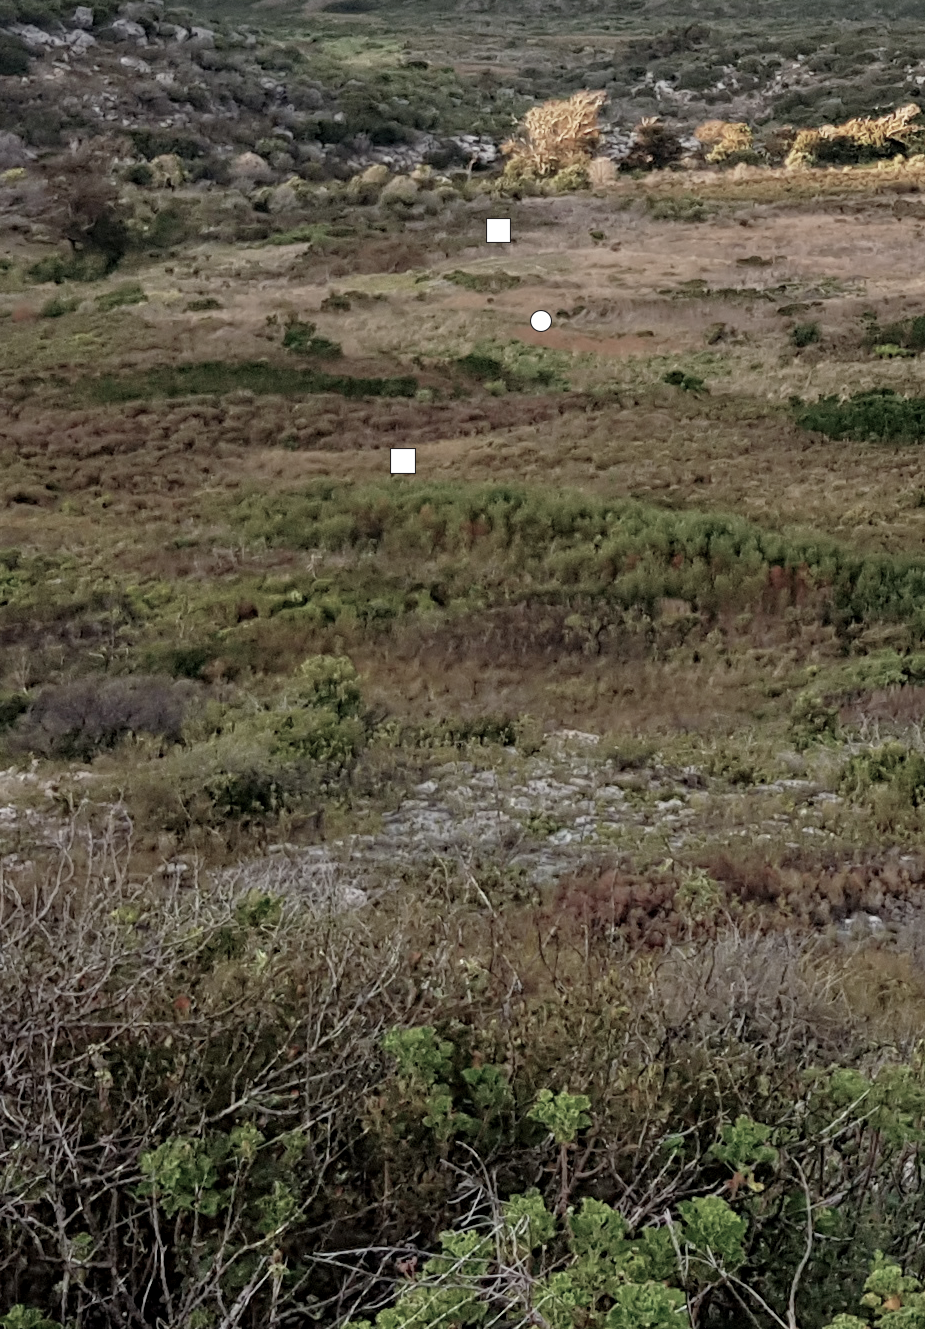
Initially the shooter lines the rifle up with the target, looks over the top of the scope to get it in the general direction and hopefully in the view field, and then transitions to the scope to find the target within the scope. During this process the target is quite literally their only singular focus, and not any peripheral crosshairs regardless of how thick or cluttered they might be. It’s surprising just how good the human brain is at ignoring what it is not focusing on and filling in the blanks.
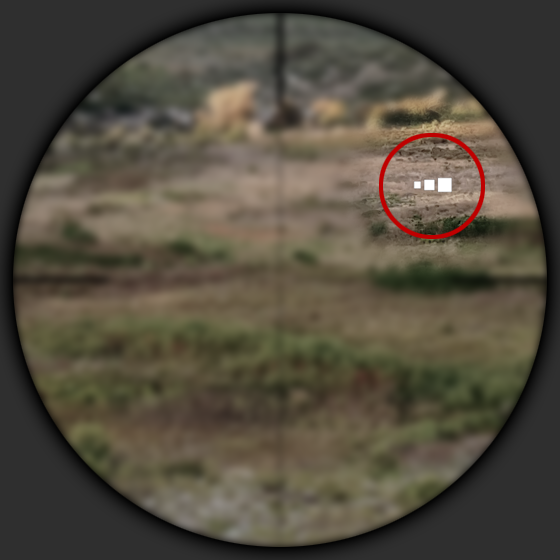
Targets are common Precision Rifle sizes 20 cm (1.4 MOA/0.4 Mil), 30 cm (2.1 MOA/0.6 Mil) and 40 cm (2.8 MOA/0.8 Mil) at 500 m.
Note the simulated blur of the reticle and background when searching for and acquiring a target.
Once the shooter acquires the target within the field-of-view of the scope, they move into a state of tight focus on the target where the reticle is almost not even seen. Then using the general sense of the circular view, and to some degree the vertical and horizontal main crosshairs, they center the scope and therefore the reticle onto the target all while maintaining focus on the target.
Focus on target.
Aligning target with scope.
Finally ‘seeing’ reticle around the target.
Only once the reticle is closely over the target, and the shooter wants to find their aim point, do they only then start ‘seeing’ the reticle, and only really the area of interest, with the rest still a ‘blur’ to the brain.
This was the basis for the ‘Wide Vision – Tight Focus’ concept that we used extensively with the design of the Schmidt & Bender GR²ID reticle, and it’s a key concept to keep in mind when deciding which scope and which reticle to purchase.
Part 3 – Understanding Volume
In taking the ‘Wide Vision - Tight Focus’ key design concept, we explored different types of grid patterns to reduce the impact of the grid to better allow unobstructed ‘Wide Vision’ while finding targets, and at the same time keeping aware that when shifting to tight focus that there was sufficient volume to be able to distinguish aim point reference data.
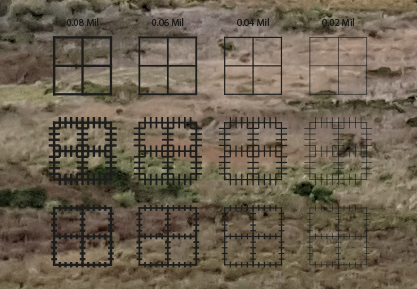
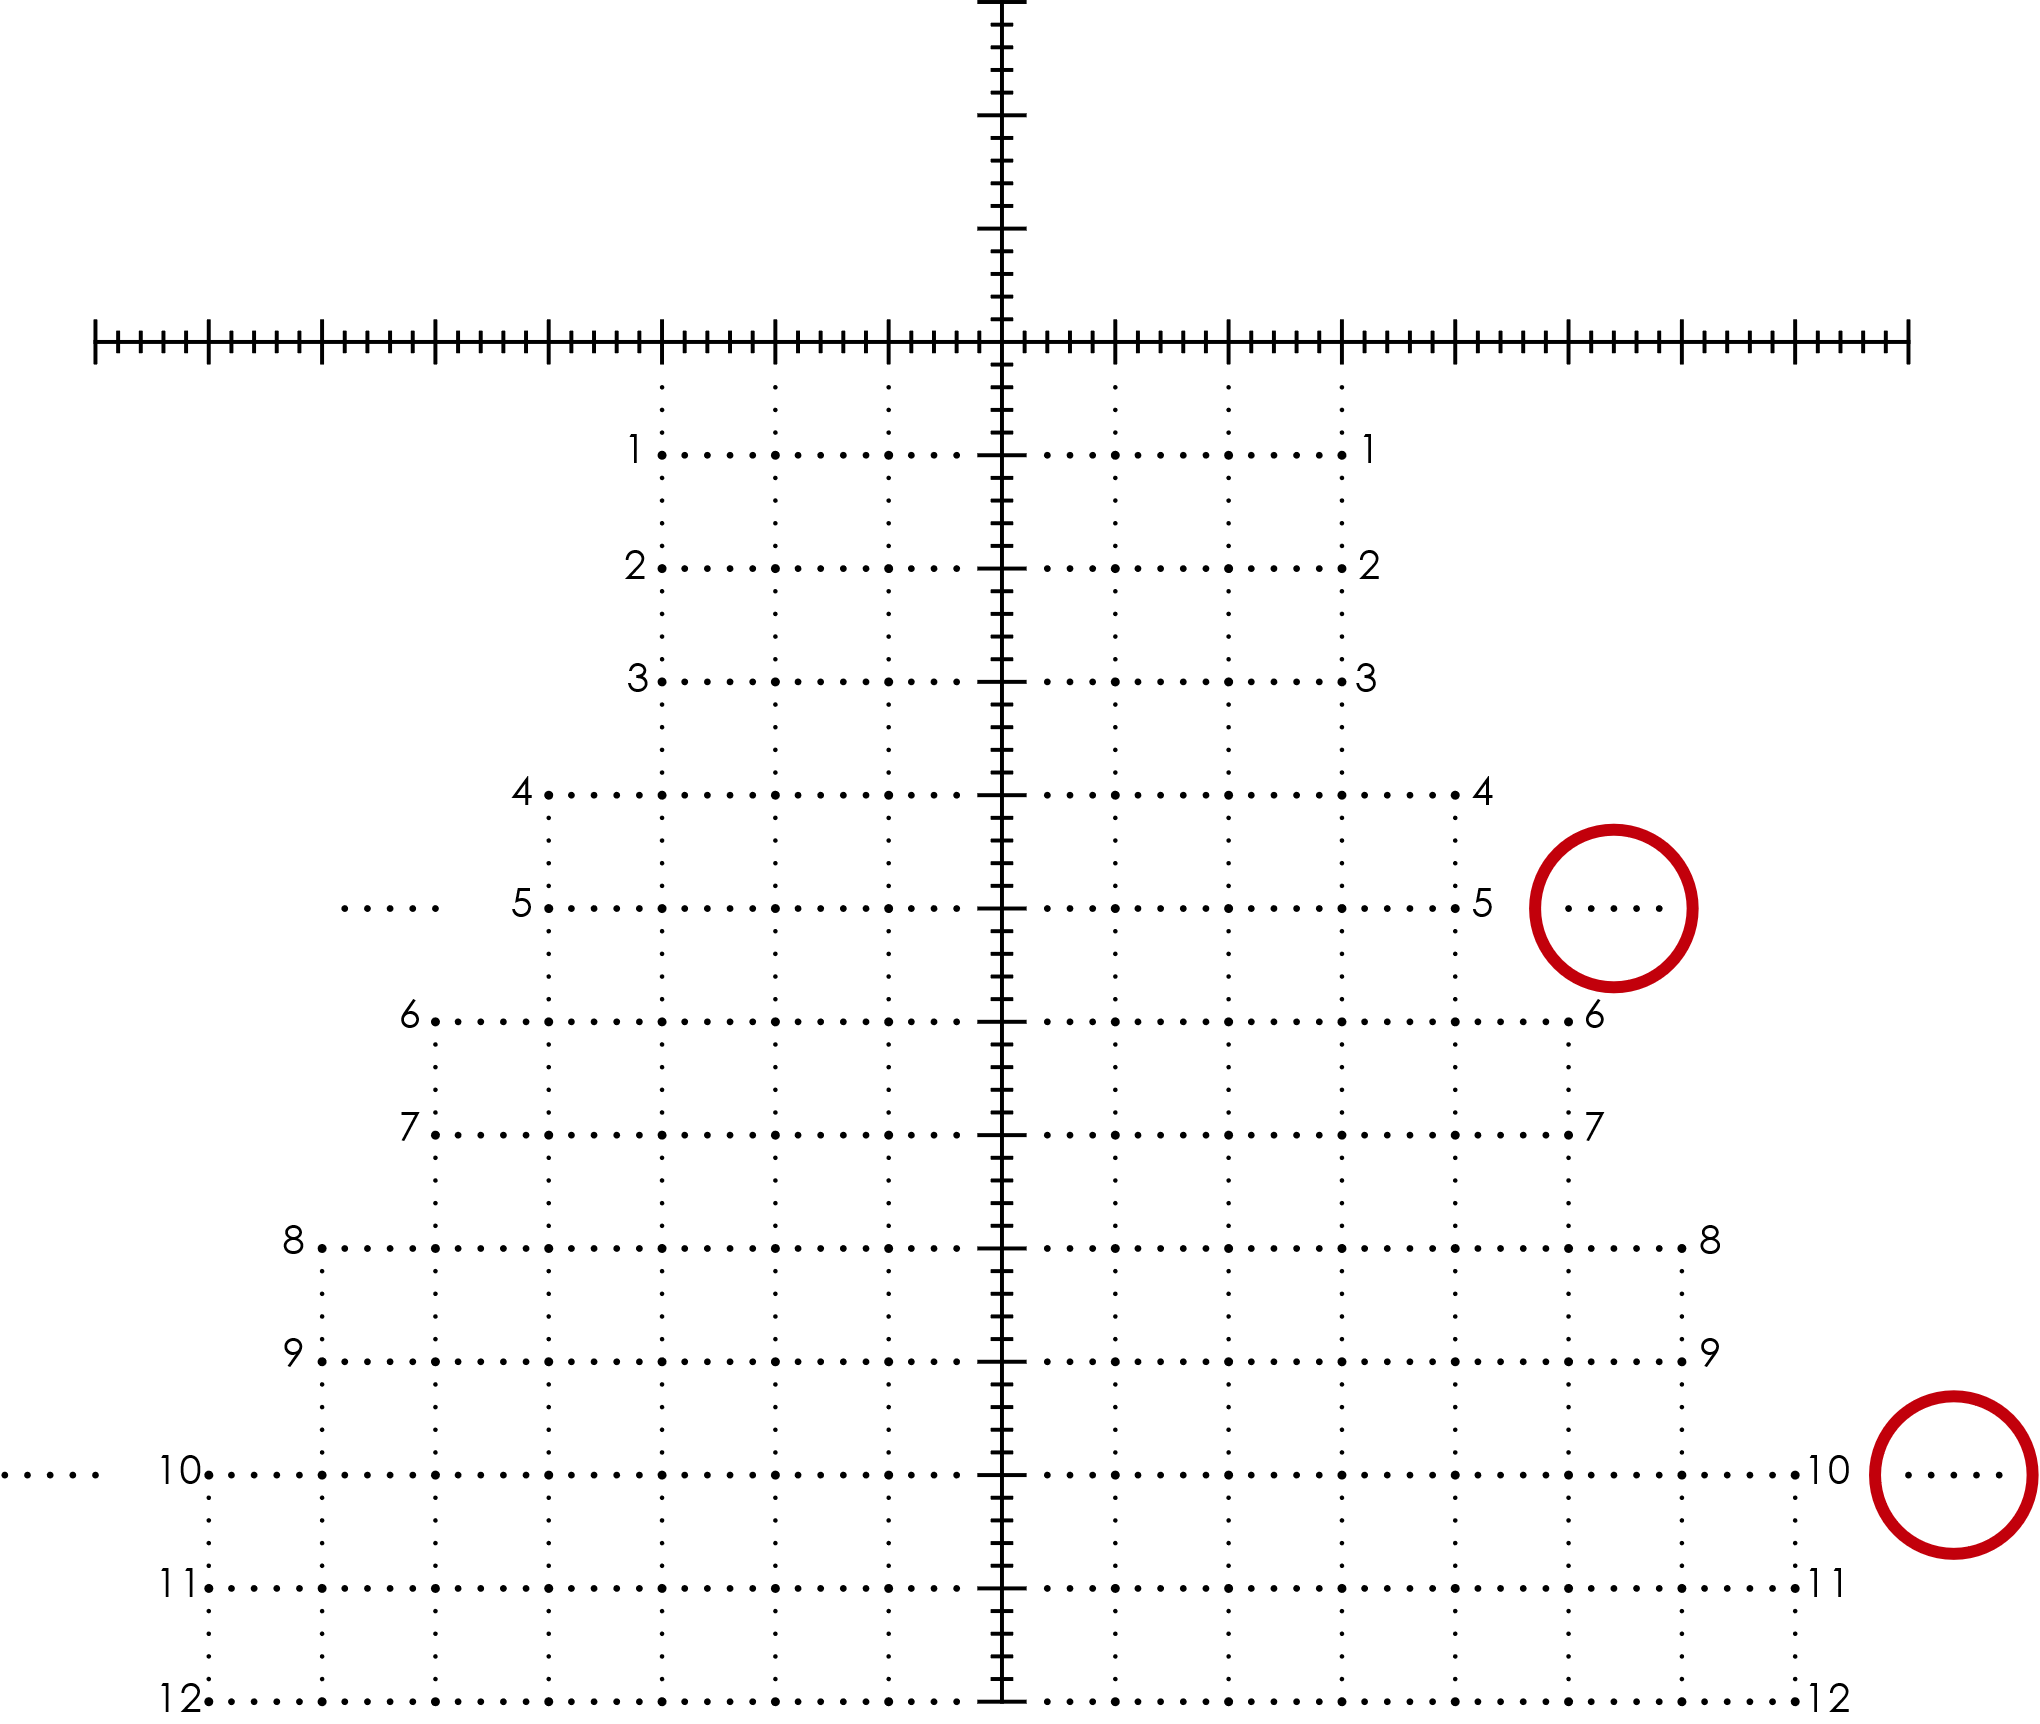
The following shows the progression, starting with a basic grid and adding in 0.2 Mil hold point references, and then reducing the length of the stadia lines from 0.4 Mil to 0.2 Mil. Each set from left to right starts at 0.08 Mil in line thickness and reduces 0.02 Mil down to just 0.02 Mil thick. For comparison, the P4FL, which is one of the worlds finest reticles, is 0.035 Mil thick.
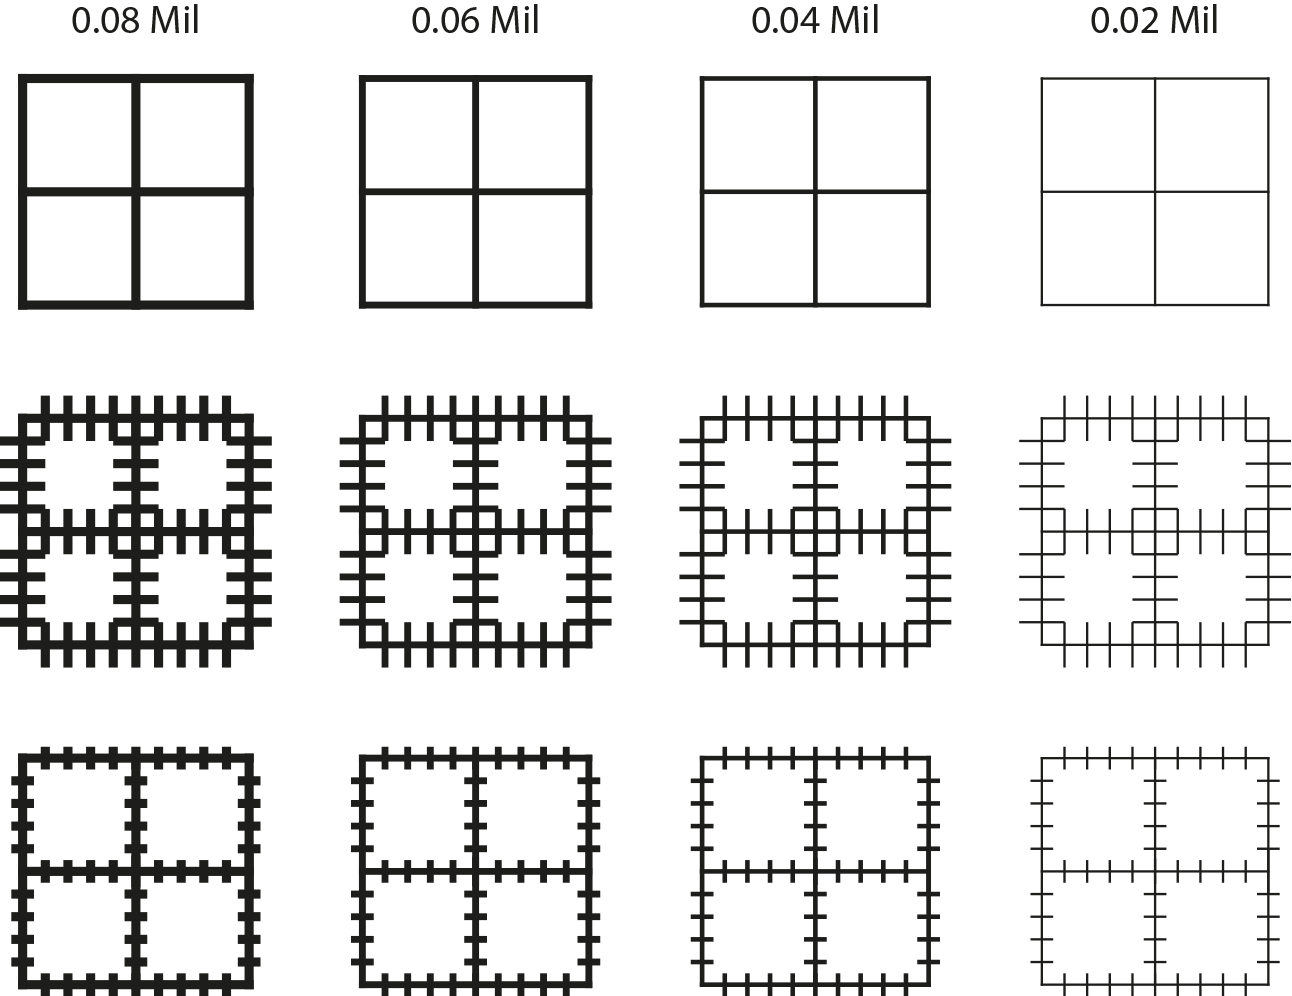
It’s very apparent that the 0.02 Mil grid is super fine and is easy to see through, but is still has a lot of ‘volume’ and still feels quite cluttered. However as soon as it’s overlaid onto a background it very quickly become apparent that the 0.02 Mil lines are a little hard to see, as can be seen in the below.
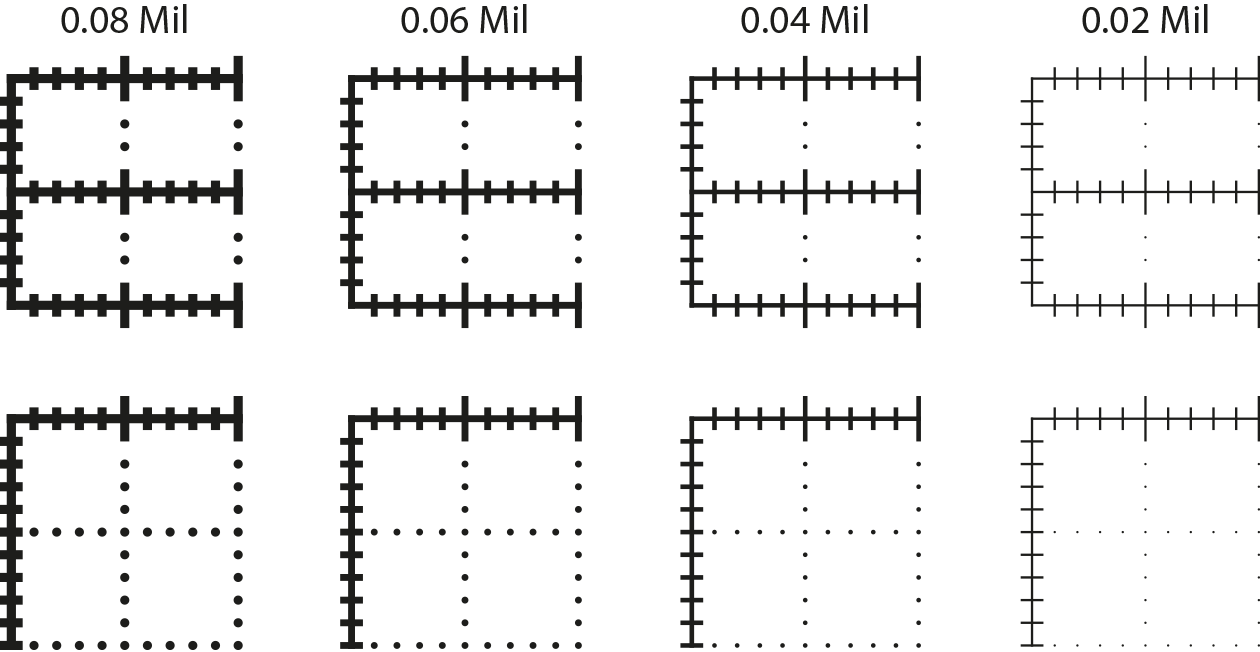
Therefore further optimization is needed to reduce volume and at the same time provide further detail when required in ‘tight focus’. This is achieved in reducing the lines down to dots, like in the following illustration.

Reducing lines to dots

Same covered area between 2 dots

2 halves = 1 dot or a circle
The volume of a line is calculated at 0.08 Mil thick x 0.2 Mil long = 0.016 Mil², where the same height circle volume is calculated at π x 0.04 Mil² = 0.005 Mil². This equates to over 3 times less volume using a dot versus a line when positioned 0.2 Mil apart. The volume of the circles reduces significantly further as the size of the dot decreases, but the distance between the dots remains the same.
| DOT DIAMETER | LINE LENGTH | LINE VOLUME | DOT VOLUME | SCALE DIFF |
| 0.08 | 0.2 | 0.016 | 0.005026548 | 3.183098862 |
| 0.06 | 0.2 | 0.012 | 0.002827433 | 4.244131816 |
| 0.04 | 0.2 | 0.008 | 0.001256637 | 6.366197724 |
| 0.02 | 0.2 | 0.004 | 0.000314159 | 12.73239545 |
When applied to the grid, one can immediately see the difference in the volume of the reticle grid, and yet the holdover reference points (stadia) are still available.
As can be seen from the above the 0.02 Mil dots are almost imperceptible, and once they are overlaid on top of a background (like the below image) the dots just about disappear completely. There is definitely a balance between too much volume and too little volume.
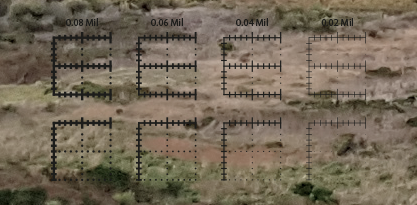
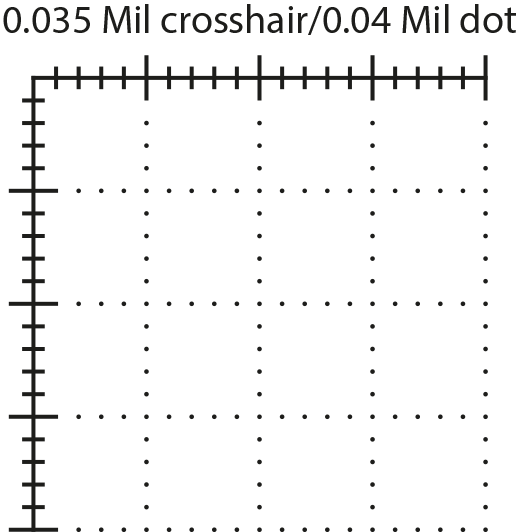
What is further interesting to note is the thickness of the crosshairs vs the dots. In terms of the crosshairs, anything between 0.04 Mil and 0.02 Mil is not too thick or too thin. It’s no accident that the P4FL reticle at 0.035 Mil is so popular worldwide.
In terms of dots, the 0.08 Mil dots are quite apparent and possible too thick, the 0.06 Mil dots have a very good balance and can be made out easily when focused on, and the 0.04 Mil dots require extra focus to see clearly but offer the best ‘see through’ and yet still retain the hold over data points. The 0.02 Mil dots are just too small at this magnification range and could perhaps be better used for reticles that are designed for extremely high magnification like required in ELR competition.
Part 4 – Balancing Volume for Reference
Our initial versions of the GR²ID reticle focused on just using a 0.04 Mil dot size as it provided the full amount of data, which could be decerned during tight focus during the final aiming process.
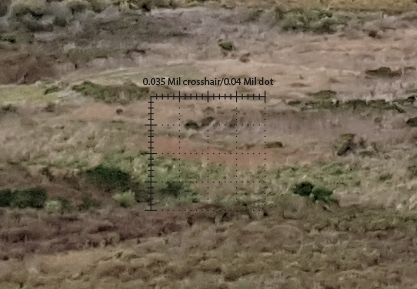
During development we realized that the 0.04 Mil dots didn’t end up working as well as expected as they were just too fine, and when transitioning from a target to the intended hold-over it was becoming too difficult to see and took longer than we felt was optimal. This was due to their size as well as the lack of points of quick reference in the grid.
Moving up to 0.06 Mil or even 0.08 Mil didn’t really help either, and it then became apparent that it wasn’t so much the dot size as the bland homogenous grid that was not assisting in getting to the data points quick enough.
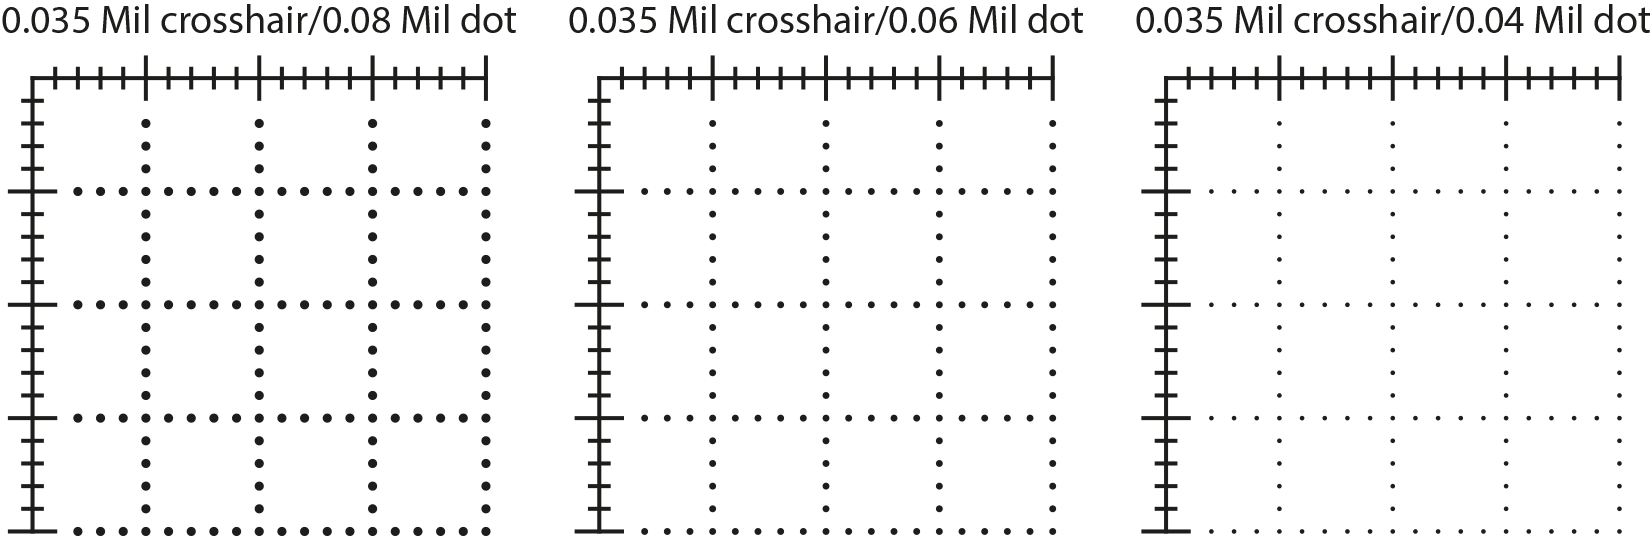
Returning to the drawing board and with 3 useful dots sizes to work with, we went back to our initial philosophies and identified the key areas that were important for the grid section of the reticle:
- No clutter/Wide Focus → 0.04 Mil dots – hardly see them
- Quick elevation line identification → 0.06 Mil dots – a good balance
- Quick Mil point identification → 0.08 Mil dots – easy to pick out
- Tight focus elevation sub data → 0.04 Mil dots – there when you need the detail
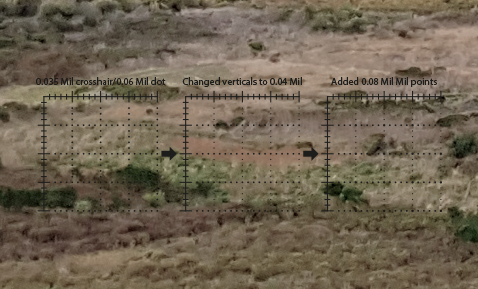
This led to the following process, where we used the 0.06 Mil dot grid as the base, changed the vertical dots to 0.04 Mil to give further ‘see through’ and reduce clutter but still retaining the required data points when in ‘Tight Focus’, and increased the Mil point marker dots to 0.08 Mil to make them easier to pick up.
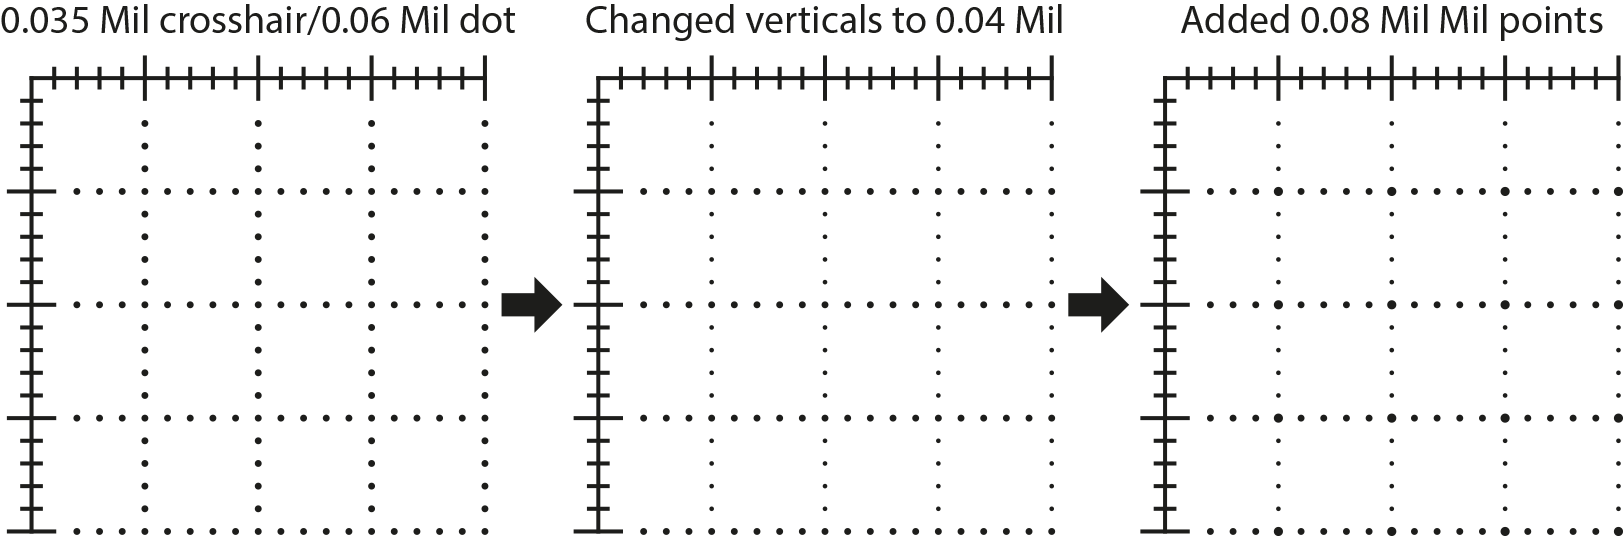
These might seem to be very subtle changes, however they make a quite big difference when viewed through the scope, especially when you’re under pressure to make the shot on a Precision Rifle stage.
This gave us a really great start to build on the design further and add the go fast speed stripes needed for Precision Rifle competition.
The subtle size differences help to quickly pick out the key points within the grid.
Part 5 – Adding quick reference – making things faster
Now that we had a great grid to work off it was again time to return back to the ‘Wide Vision – Tight Focus’ philosophy and look at ways to assist the shooter from finding the target to setting the aim point and breaking the shot as fast as possible.
While designing the grid I specifically shot a match using just holdovers with a plain old hash reticle scope without any stadia numbers on the vertical crosshair (like below example). This made finding holdover aim points extremely difficult, and I kept finding that I was finding the target, then looking at the crosshair and counting Mils from the top to find the elevation hold, then looking back at the target to line it up and subsequently losing my hold point in the reticle.
I’d then have to restart the counting process on the elevation crosshair all over again. The result was a staggered back and forth and wide vision and then tight focus and back and forth … while I worked the target closer to the aim point I was wanting, and it ate up a huge amount of my stage time.
Sure… I could probably do this faster with a lot of practice, but there had to be a faster way to get this right.
As much as it was a funny but weird self-reflection moment, it was also a great real world experience for the design process that we were working on in the design of the grid.
The very next day we added elevation Mil numbers on every single elevation line on both sides of the grid. As much as skipping every second line would have been nice to reduce clutter, we rather felt that being able to instantly see the elevation numbers required and not having to think about what number came next, was significantly more useful when shooting a Precision Rifle stage under pressure.
To add further to the speed to pick up holdover points the S&B development team had a very cool idea and added ‘winglets’ to the 5 Mil and 10 Mil lines to really make it easy to pick up during the initial ‘Wide Vision’ part of the target acquisition. This really helped to transition to ‘Tight Focus’ after acquiring the target and moving the target into the general vicinity in the reticle for the intended elevation holdover.
This then allowed for a quicker ‘Tight Focus’ on the required aim point within the grid.
These might seem like very subtle changes, however the sum of all the small parts adds to an extremely fast holdover reticle that shaves seconds off Precision Rifle stage times.
Part 6 – Adding the details
Now that we had completed the main functionality of the grid, we added other features to aid competitors in Precision Rifle competition.
Independent Dot
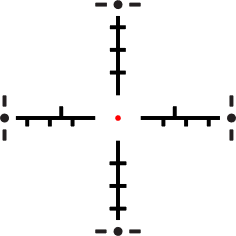
The independent dot in the center of the reticle was a great addition that made maximum magnification zeroing much easier. The dot is just 0.05 Mil in size which equates to a 5 mm dot at 100 m. Given that most Precision Rifle shooters shoot a 6.5 mm or 6 mm bullet, this dot doesn’t fully cover a hole in the target, allowing for precision aiming.
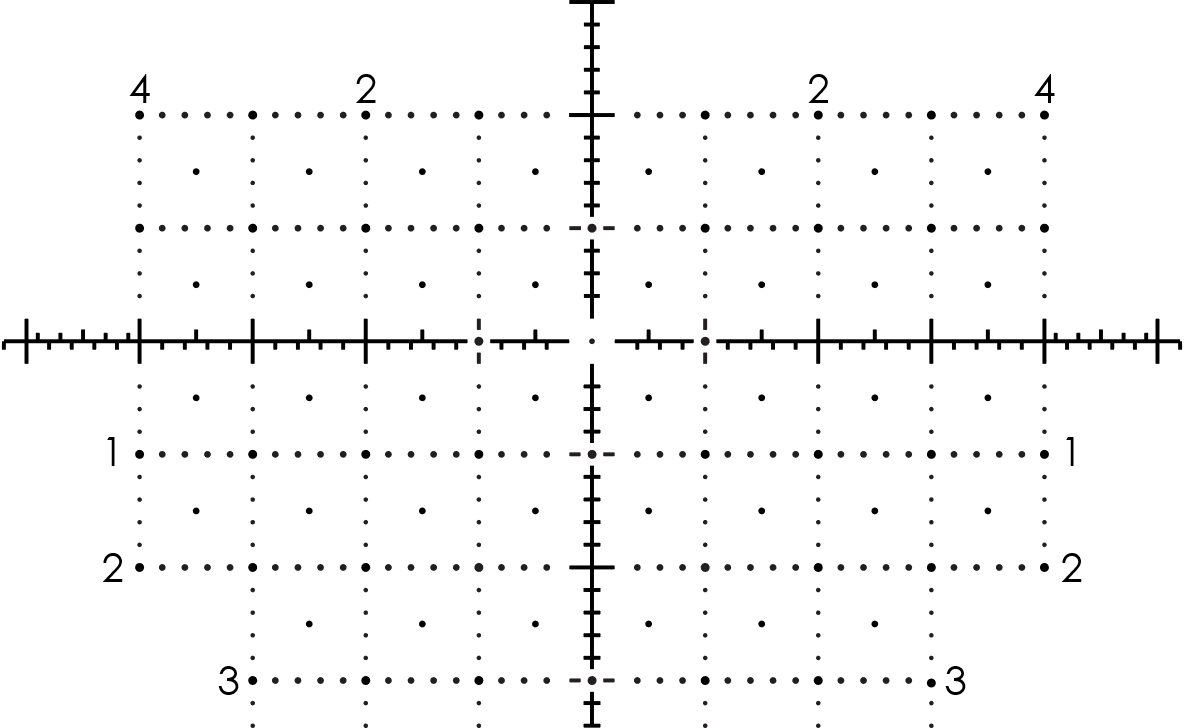
Additionally the crosshairs start exactly at 2 Mil, so holdoff or holdover points are not compromised and are easy to find. This can be seen as the crosshair lines are not rounded on the end, but rather flat, and therefore more precise and don’t leave any room for confusion.
Half Mil stadia and grid hold points
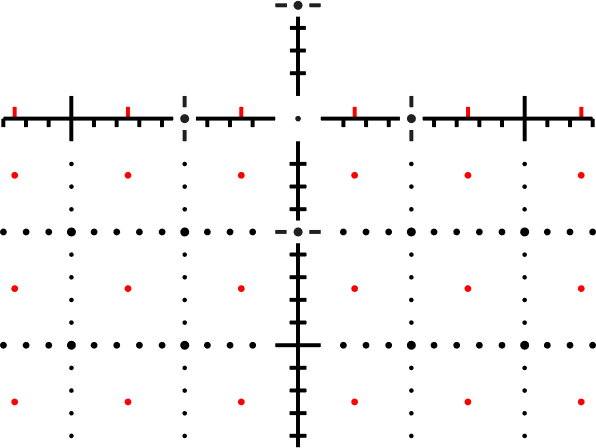
We knew from the start of the design that we wanted 0.2 Mil hashmarks on the horizontal and vertical crosshairs, however we found that we missed the super quick ‘half’ Mil reference points that you find on the P4FL reticle. Again this goes back to how the human brain works, and the counting problem outlined earlier. If you’re looking for 0.6 Mil, you tend to start at 0 and count 0.2, 0.4, to 0.6, and as the stadia are all uniform, it’s not so easy especially under pressure and takes up valuable time. Just by adding the 0.5 stadia above the crosshair allows the shooter to get to 0.6 that much faster.
The same applied in the lower grid and we added the 0.5 Mil dots in the middle of each Mil square to provide a fast point of reference throughout the entire grid.
The Holdunder Grid
One of the most unusual features of the GR²ID reticle is the holdunder grid, and many can’t understand why it’s useful, and yet this is a feature I use on at least 1 stage in every single Precision Rifle match I shoot.
In most matches you’ll find a stage where there are multiple positions and at least 2 targets at different distances which need to be engage once each from each position. Given the time constraint, you would want to use holdovers instead of dialing to get to the end of the stage before timing out, and often it’s the far target that is the most difficult to shoot and requires the most precise aim. Without the holdunder grid, you would either holdover for both targets or normally dial out the close target to the horizontal crosshairs and then holdover for the far target. This isn’t optimal, as you’re using the most precise part of the reticle for the easy target and holding elevation and windage for the harder far target.
By creating a holdunder grid the shooter can instead dial out the far target to the more precise horizontal crosshair and then holdunder for the closer target. This really shines when engaging a KLY rack with a closer confirmation target that needs to be engaged between each KYL target engagement. Not only does it save time on the stage, but it provides the right amount of precision when you need it most.
This was an idea that Bryan Morgan (2014 PRS Series winner, and owner of the legendary Hat Creek Training in the USA) came up with and we implemented into the grid. I’d love to say that this was my idea, but credit must be given where it’s due.
0.1 Mil ranging detail

The grid was designed primarily for Precision Rifle competition (and not Military application) and therefore it lacks any of the normal ranging tools that are normally found in the other Schmidt & Bender reticles. There are however; some stage in Precision Rifle matches that require ranging the target and then engaging. These stages are very rare nowadays and therefore the reticle provides the minimum 0.1 Mil ranging stadia on the 5th Mil section of the main horizontal reticle.
Side bars
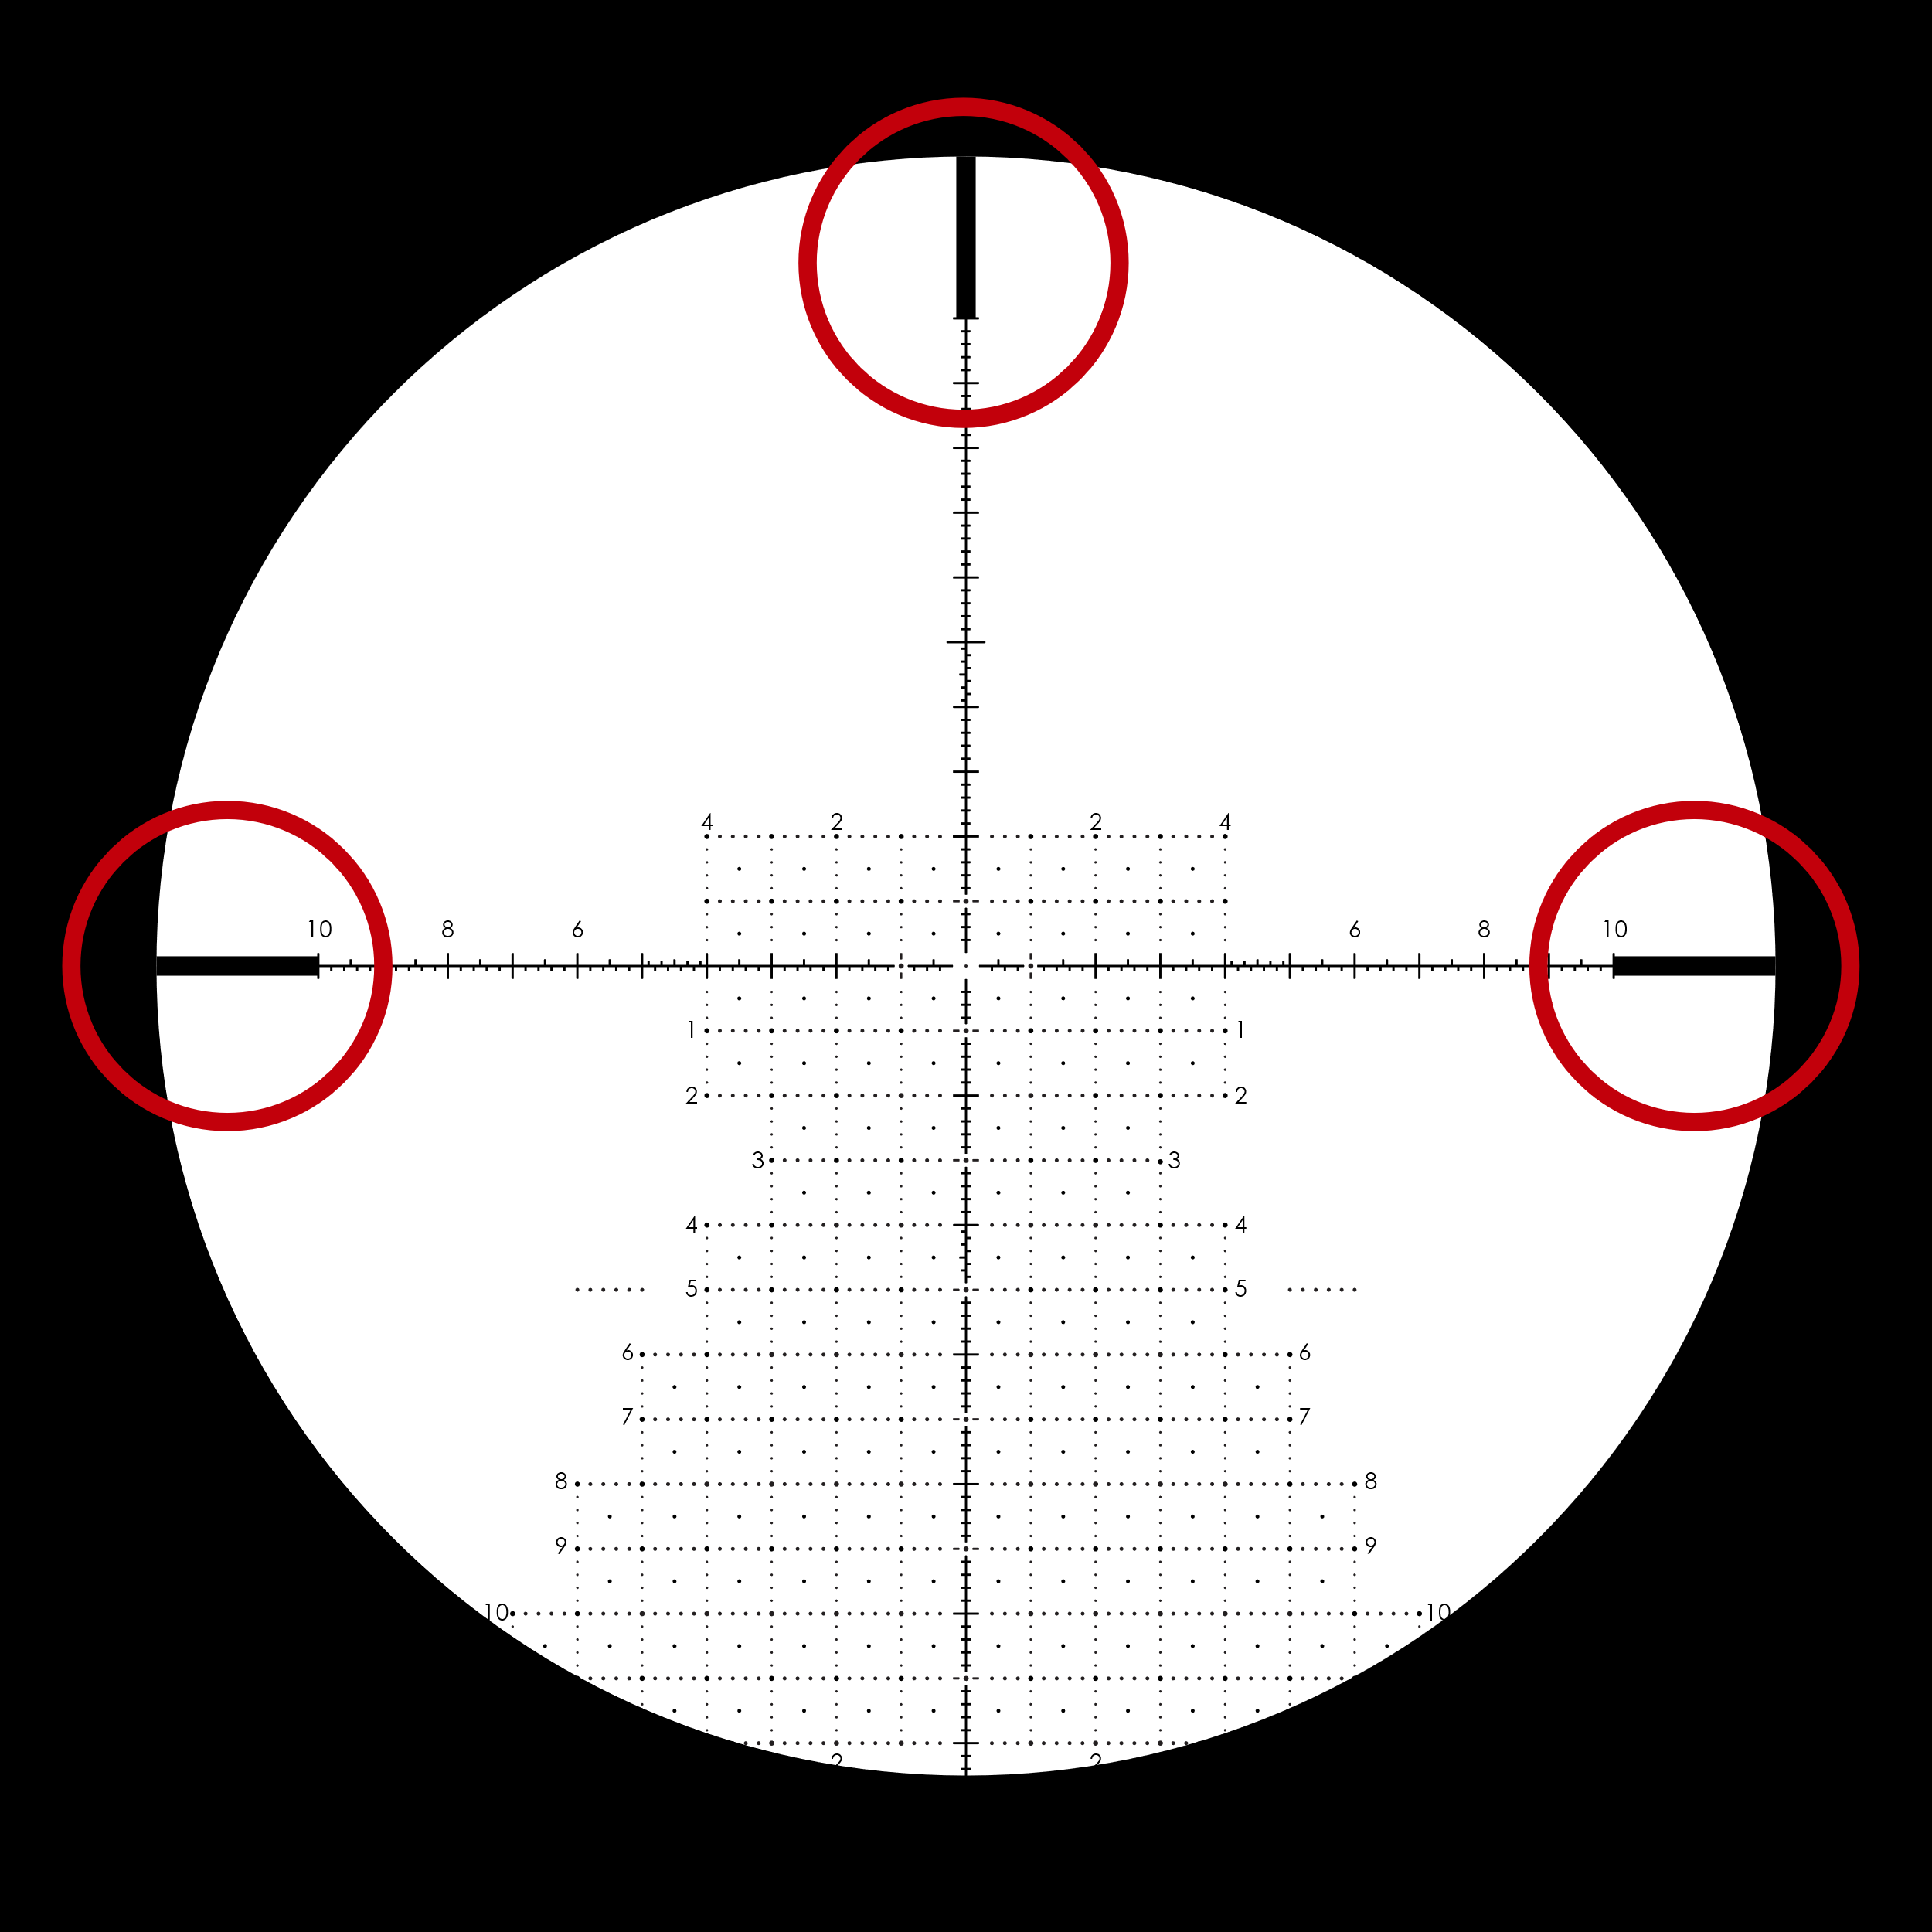
Another key speed feature was the addition of thick bars on each side of the reticle and at the top. During ‘Wide Focus’, the main reticle ‘disappears’ out of focus, however the thickness of the side bars helps the eye to pick up on the heavy ‘volume’ of the side bars to quickly move the target into the middle of the reticle.
This concept can be seen in the above photo, these ‘side bars’ are easily seen at 15x magnification and still remain distinct despite the blurring.
Part 7 – Lighting it up
When it came time for illumination, there was quite a bit of debate amongst the design team on the features needed, or even if illumination was needed at all.
Precision Rifle matches are held during daytime hours, and unless you’re shooting the Midnight Sun Rifle Challenge in Sweden, it’s always too bright for illumination to be useful.
In the end, we decided to use the ‘red’ of the illumination rather as a 2nd colour channel rather than an illumination feature for low light. This would further add features to pick up reference points faster.
We created a constellation around the center of the reticle to further draw the eye to that area during ‘Wide Focus’, and additionally we added a tree reticle into the grid.
The larger 0.08 Mil dots at the Mil points provided just enough volume for the illumination to be visible during daylight hours without having to resort to the expensive daylight visible illumination technology found in the LRR reticle.
Part 8 – Speeding from Wide Vision to Tight Focus
Now let’s take you through the design philosophy when shooting a Precision Rifle stage so that you can get the most out of the Schmidt & Bender GR²ID reticle.
Lets take the stage from the start of the article, break it down and then take you through the grid process.
Stage Briefing
Tank Trap – Three for 3
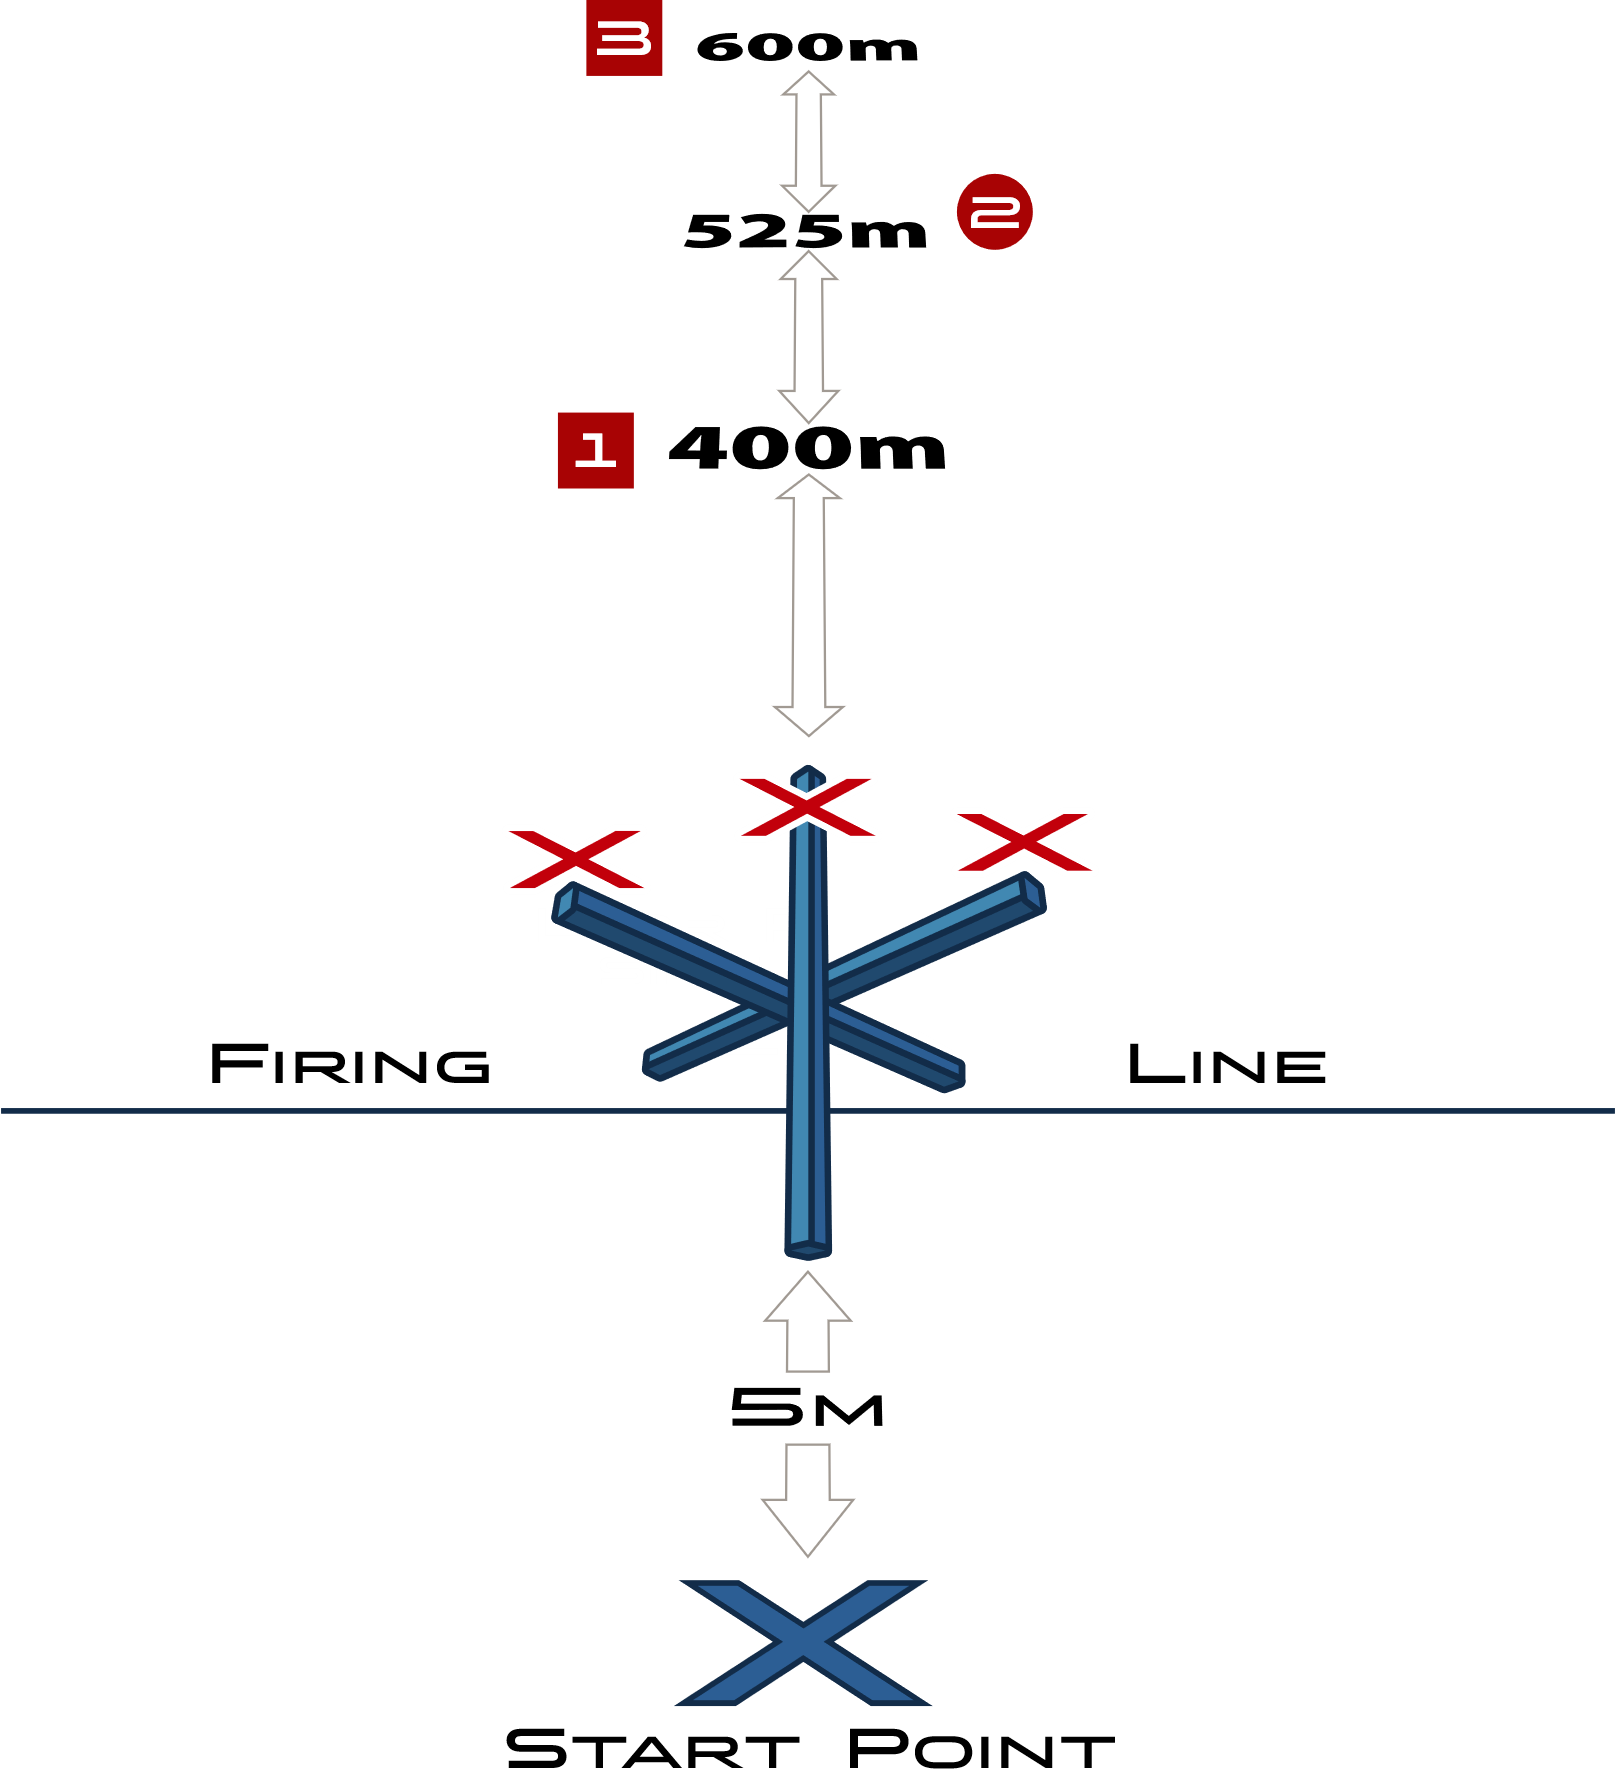
Briefing:
There are 3 positions on a tank trap and 3 targets at various different distances between 450 m and 600 m. Each target must be engaged with 1 shot each from near to far from each indicated position within a 2 minute time limit.
Targets:
| DESCRIPTION | DISTANCE | SIZE | MOA SIZE |
| A – SQUARE | 450 m | 40 cm | 3.1 MOA/0.9 Mil |
| B – CIRCLE | 525 m | 40 cm | 2.6 MOA/0.75 Mil |
| C – SQUARE | 600 m | 50 cm | 2.9 MOA/0.85 Mil |
Wind:
Medium to difficult conditions, with a valley wind running ½ value up through the valley past the targets from left to right at 14 kmph.
Straight off the bat, the first things to recognize:
- The points of the tank trap are not easy to shoot off. (thanks Mr Match Director)
- The 40 cm at 450 m is a decent size target – I should get a decent wind call off of it.
- The circle is not only the most difficult to shoot, but it’s also the smallest (thanks again Mr. MD)
- Those distances don’t look that far apart if I run them through my ballistic calculator.
The next step is calculating the elevation and building a wind bracket to work with. I normally use a Kestrel 5700 Elite with Applied Ballistics software to calculate my firing solutions, which gives the following results:
| DESCRIPTION | DISTANCE | ELEVATION | WIND LOW (10 KMPH) | WIND HIGH (15 KMPH) |
| A – SQUARE | 450 m | 2.65 Mil | 0.5 Mil left | 0.75 Mil left |
| B – CIRCLE | 525 m | 3.4 Mil | 0.6 Mil left | 0.9 Mil left |
| C – SQUARE | 600 m | 4.3 Mil | 0.7 Mil left | 1.0 Mil left |
Straight away I can see that the targets are both around 0.75 to 0.9 Mil apart from each other, which is well within the 2 Mil of the holdunder grid. With the circle target being the smallest, can redo my firing solution to something like the following:
| DESCRIPTION | DISTANCE | ELEVATION | WIND LOW (10 KMPH) | WIND AVE | WIND HIGH (15 KMPH) | WIND DIF |
| A – SQUARE | 450 m | -0.75 Mil | 0.5 Mil left | 0.625 Mil left | 0.75 Mil left | 0.25 Mil |
| B – CIRCLE | 525 m | 3.4 Mil | 0.6 Mil left | 0.75 Mil left | 0.9 Mil left | 0.3 Mil |
| C – SQUARE | 600 m | 0.9 Mil | 0.7 Mil left | 0.85 Mil left | 1.0 Mil left | 0.3 Mil |
As both the A and B targets are around 0.9 Mil in size or 0.45 from top/bottom to the middle, I’ve got a bit of room to work with on elevation, as my Standard Deviation on Muzzle Velocity is well within 0.2 Mil on either target, and with a decent range finder I’m inside of that too on range uncertainty.
So already I’m feeling confident about using the grid to hold under and over.
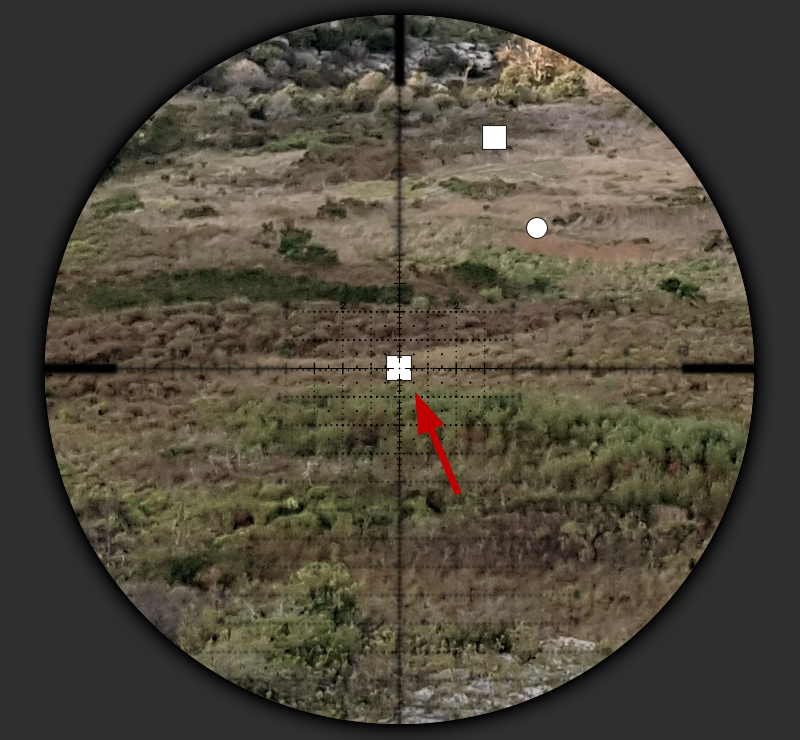
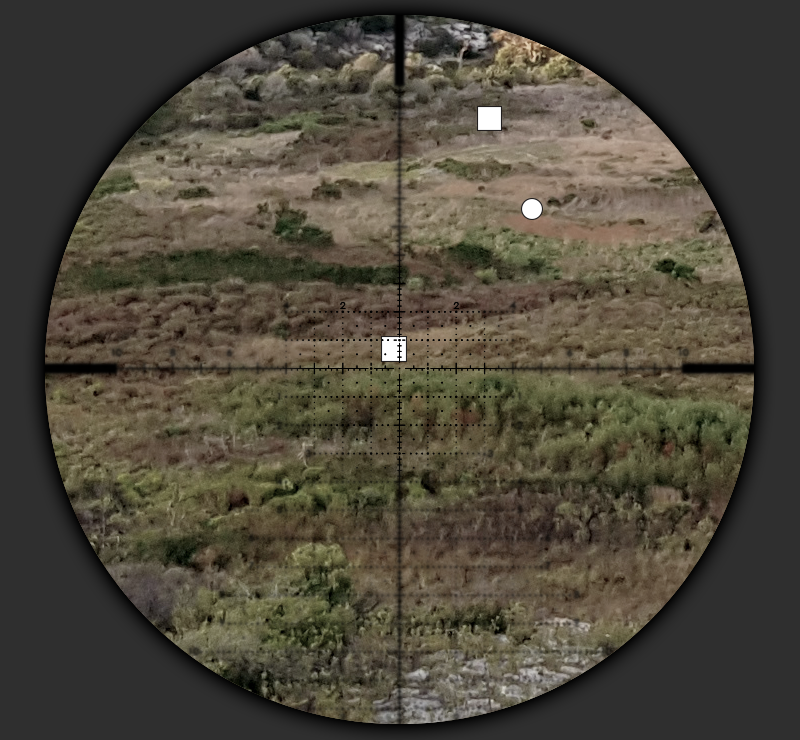
Here’s what that is going to look like in the reticle:
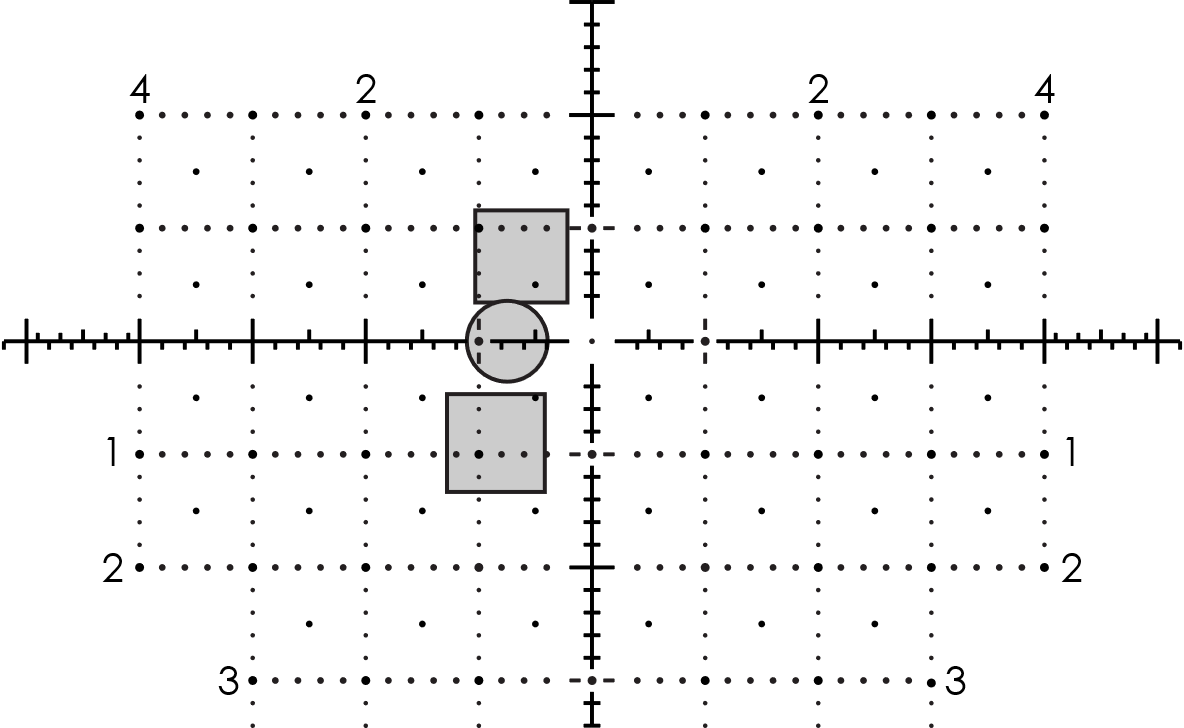
But hold on… Those are really close to each other on wind. If I dial out 0.8 Mil left on the windage turret, that should center up nicely on the vertical.
I just need to favor right on the first target, and it’s well inside of my estimated wind hold even if I hold center, so I should be good to go regardless. So now all I need to remember on the stage is 0.8 hold under and favor right for the first, dead up for the 2nd and 0.9 down on the 3rd, which means I no longer have to reference my DOPE card between shots and I’ll save a pile more time.
Already I’m starting to feel confident on getting through the stage before timing out.
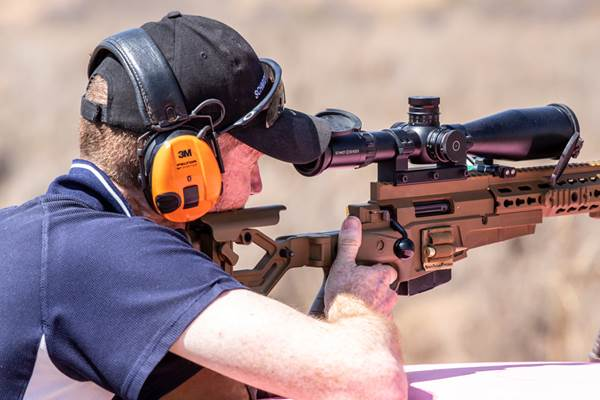
When it’s my turn to run the stage, I grab my trusty barricade bag, and check my settings on my scope:
Scope caps: up
Magnification: 15x
Elevation Turret: 3.4 Mil
Windage Turret: 0.8 Mil
Parallax: +/- 525 m
The RO asks ‘Shooter do you understand the course of fire’, which I answer ‘Yes’, followed by, ‘Shooter make ready’. I then insert my magazine and remove the chamber flag which I hand to the RO while maintaining muzzle direction down range. At this point my nerves are starting and the adrenalin is starting to pump and there is this weird rushing noise building in my ears. The RO, happy with my readiness then says ‘Shooter are you ready’, which I answer ‘Yes’ and he then says ‘Stand by’… and I wait an eternity for the ‘beep’ to signal the start of the stage.
I now move over to the tank trap, and carefully place my barricade bag on the 1st position and then drop the rifle onto the bag with intent, while making sure to try and line it up directly with the target to ensure that the target will hopefully be within my field of view when I get behind the scope, or really close.
I then drop behind the back of the rifle and look over the top of the scope to ensure it’s pointing towards the closest target (as per stage briefing). By doing fine corrections here I’ll save more time trying to hunt around through the scope for the target, and I should be able to see the target when I get behind the scope.
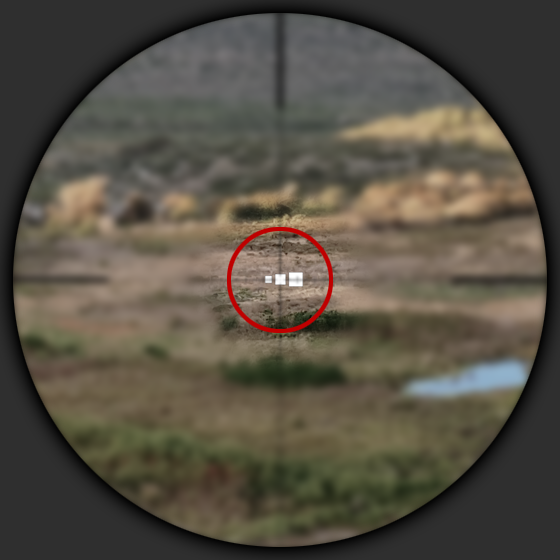
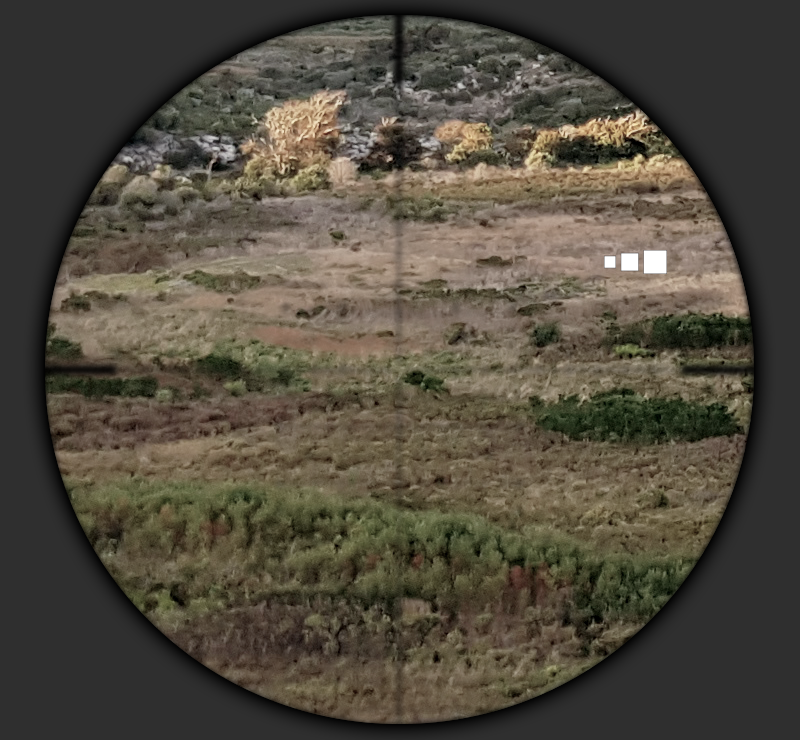
Luckily I can see the target in the bottom of the field-of-view, and because I’m looking past the reticle in ‘Wide Focus’ it’s easy to see, and I can easily align it with the center of the scope.
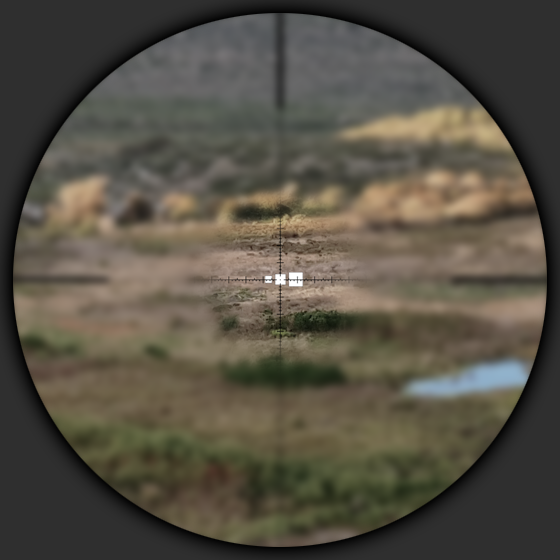
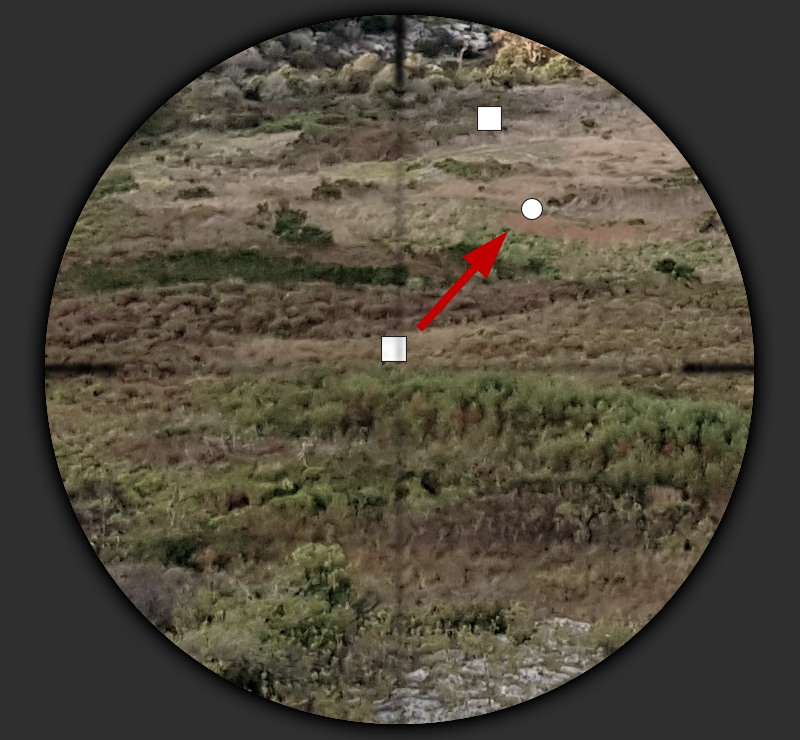
Only once the target is within the center of the scope to I begin to look for the reticle and I comes into focus, and primarily around the area of the target.
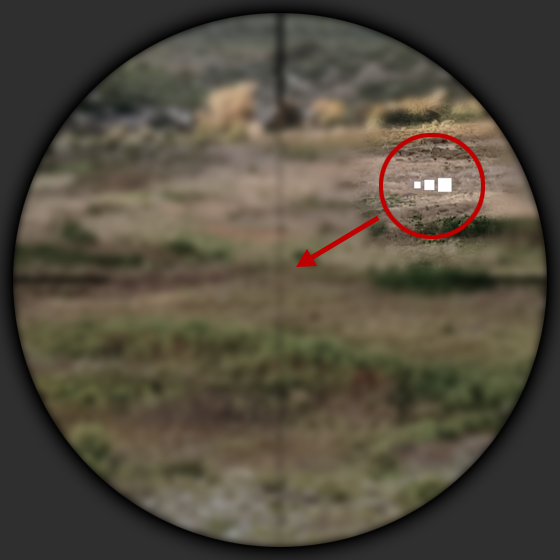
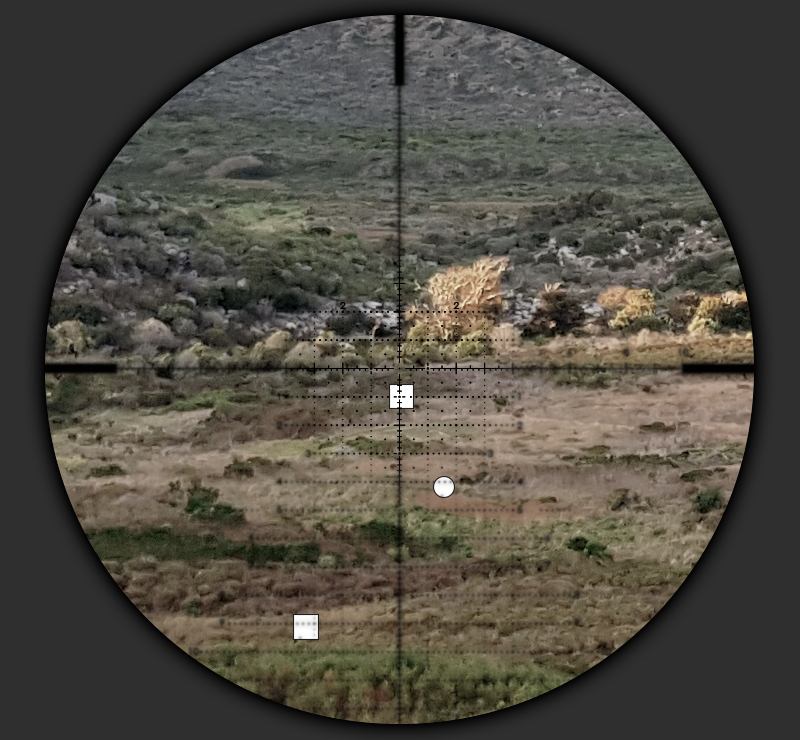
Once I’ve got it close to the center of the reticle I finally remember (stress is running at this point, and the brain is a bit slow) to move it to the hold under position of 0.8 Mil under and favor right. Which looks like the following.
I then close the bolt and have a look for any wind indicators, that might make me adjust my hold from my initial estimates, before making the shot. When the shot breaks it’s a matter of trying to ride the recoil as best as possible to get a glimpse of the impact point. This is really where shooting a Schmidt & Bender scope shines. The clarity is incredible and impacts are so much easier to see when you’re using a premium scope like a PM II.
Any deviation in impact point from point of aim can now to be applied to the subsequent targets to increase the stage hit rate.
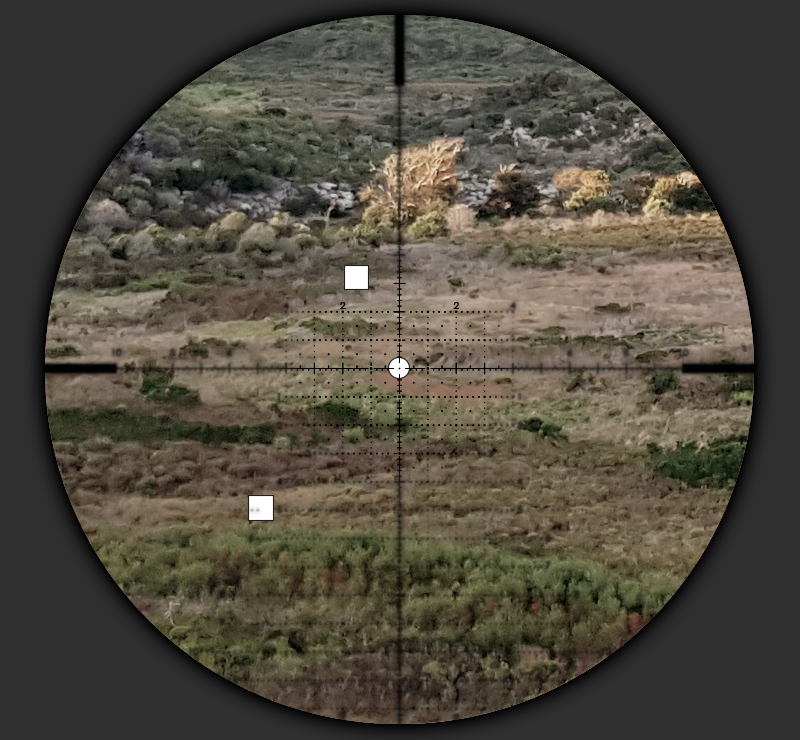
I open the bolt and luckily the next target is in the generous field-of-view and I can easily transition to it without having to take my eye off the glass. Again, in looking to the next target, we enter ‘Wide Focus’ mode and the reticle all but become invisible again, and this time we can take the reticle straight to the center of the target and not have to find the next hold over or under point.
Given the time I’ve saved so far I can now take my time a little more and really take a good look at any wind indicators, maybe even take a look at any mirage at 525 m (parallax setting) and then focus on the center dot and place my shot exactly where I want it on the target.
Again, I go through the same procedure and only close the bolt when I’m ready to take the shot and make any final adjustments.
I then break the shot, try spot any impacts and immediately enter ‘Through Focus’ to spot the impact before opening the bolt before again and ‘Wide Focus’ to find the last target, which again thankfully is still within the field-of-view from the middle target.

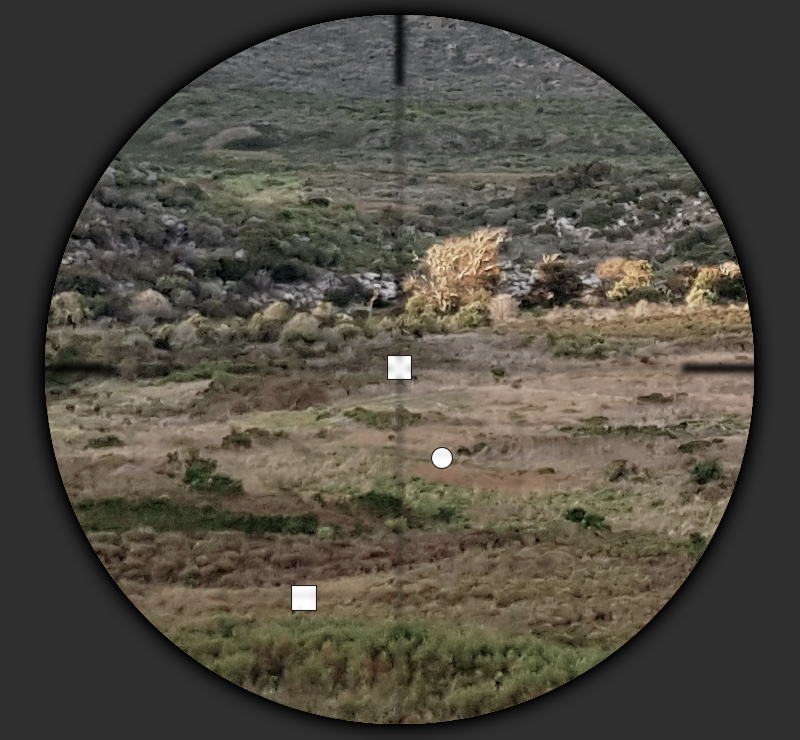
Once I’m on the furthest target I then switch to ‘Tight Focus’ and find my holdover point of 0.9 Mil, and close the bolt. I then think… I could probably just put it directly on the 1 Mil line as the target is way bigger than the 0.1 Mil difference that it would make and I can use the 0.2 Mil windage dots better. So I decide to hold the 1 Mil line and favor a tiny bit left to compensate for wind.
Again, I’ve got plenty of saved time, so I take a look at any environmentals before breaking the shot, and transitioning to ‘Through Focus’ to attempt to spot the impacts.
After spotting the impact, I then open the bolt, lift my head and switch over to the 2nd position on the tank trap and then the last all while repeating the above procedure from the nearest target to the furthest.
The Schmidt & Bender GR²ID reticle has saved me a huge amount of time and given me more time to place my barricade bag better, get a sense of the wind and break a clean shot. In the game of Precision Rifle competition, these are massive advantages.
Part 9 – Great Team
One of the highlights of working on the Schmidt & Bender GR²ID project was working with the S&B development team (Jonas Hoeller & Michael Holzmann), as well as David Holte (USA) and Scott DiCapio (USA). The level of input, knowledge and professionalism by everyone on the project made the experience one of the most memorable in my entire shooting career, and ultimately produced one of the finest Precision Rifle reticles produced to date.
By Rob Ramsden
Schmidt & Bender GR²ID reticle – lead designer
Vice-President of the International Precision Rifle Federation (IPRF).